Whether you’re an R&D engineer refining plastic blends for injection molding, a QA specialist checking consistency in silicone rubber molding parts, or a procurement pro verifying material specs, Shore hardness is critical for plastic and rubber products, it directly shapes how injection-molded components (e.g., rigid PC cases) and silicone-molded items (e.g., soft seals) perform.
It also impacts a product’s feel (soft TPU phone cases vs. rigid PC shells), functionality (tire wear resistance, seal flexibility), and fit for its use. Yet many teams struggle with common issues: inconsistent readings, choosing the wrong Shore durometer (A vs. D) for molded parts, or neglecting instrument maintenance that skews results. To fix these, KingStar has created this easy guide, covering what Shore hardness is, step-by-step testing, and maintenance tips.
Hardness is a measure of the degree of deformation under pressure or the resistance of a material to penetration. Hardness can be classified as relative hardness and absolute hardness. Absolute hardness is primarily employed within the scientific community, yet it is seldom applied in industrial production scenarios. We usually use relative hardness as the measurement system, and the commonly used marking methods are: Shore, Rockwell and Brinell. The Shore hardness scale is typically applied to rubber and similar materials.
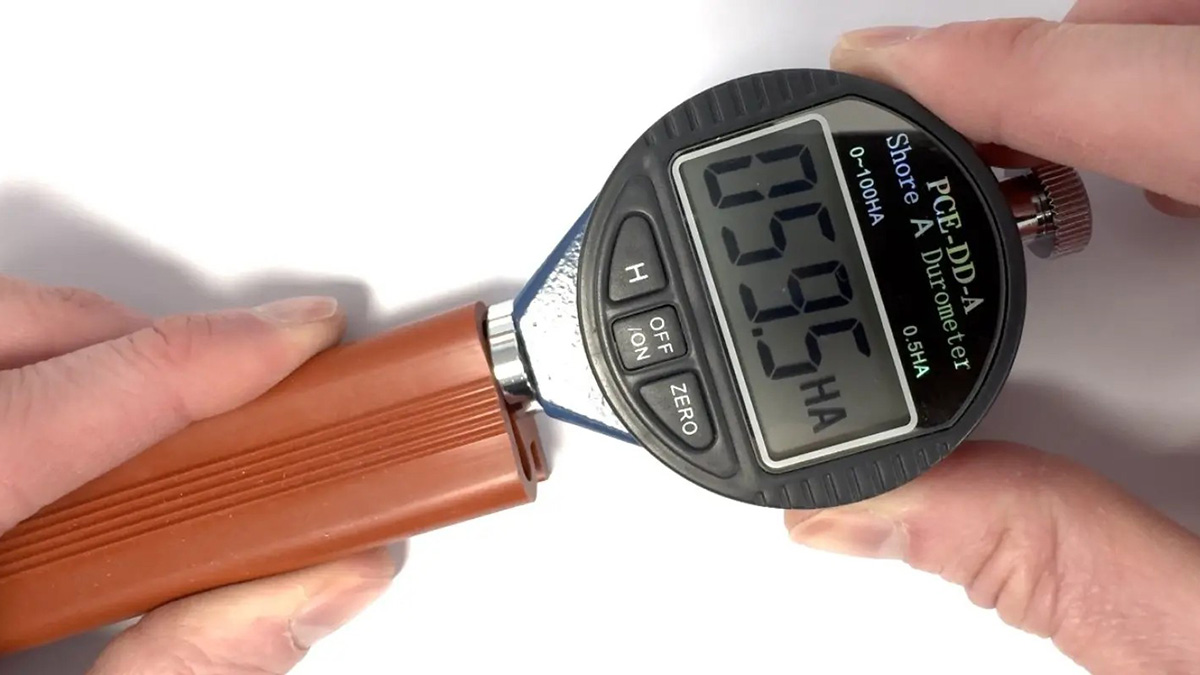
The method for testing Shore hardness is as follows: Insert the indenter of the durometer into the surface of the material being tested. The pointer on the dial is connected to the indenter via a spring. The depth at which the indenter penetrates the material determines the position of the pointer. The value displayed on the dial is the Shore hardness value.
The method for testing Brinell hardness is: Use a steel ball of a certain diameter to press into the material under a specified load. After a mark is left on the material’s surface, the value displayed on the durometer’s dial is the Brinell hardness value.
Rockwell hardness and Brinell hardness are commonly used for testing metal materials. Generally, the Rockwell hardness value is approximately one-tenth of the Brinell hardness value, but the two cannot be directly interchanged in this way.
Because principles behind Shore hardness and Rockwell hardness are different, there is no universal conversion relationship between them. However, there was an instance where a Rockwell durometer was used to measure hard rubber. The comparative data at that time was: Shore hardness 90 corresponds to Rockwell hardness 27.
2. What Is Shore Hardness?
In plastic products, Shore hardness is commonly used to measure the softness or hardness of the material. The reading unit of the Shore durometer is °, and the most used two description methods are A and D, which represent different hardness ranges.
Measurements below 90 degrees are tested using the Shore A durometer to obtain data; measurements of 90 degrees and above are tested using the Shore D durometer to obtain data. Therefore, generally speaking, for a rubber or plastic product, during the testing process, the tester can make a pre-judgment based on experience and decide whether to use the Shore A durometer or the Shore D durometer for the test. Generally, products with relatively large or soft feel can be directly judged to be tested using the Shore A durometer, such as stationery glue bottles, TPU/TPR plastic film bags, etc. While products with basically no elasticity or relatively hard feel can be tested using the Shore D durometer, such as PC/ABS/PP products.
Usually, if the hardness value is marked as “Shore A xx”, it indicates that the material hardness is relatively low; while marked as “Shore D xx” indicates that its hardness is relatively high.
It should be noted that the unit of Shore hardness has distinctions in expression: the unit of Shore A type hardness is HA; the unit of Shore D type hardness is HD.

3. Shore Durometer Types: Which One Should You Use?
The Shore durometer is a measuring device designed for measuring the hardness of materials like vulcanized rubber and plastic products, and similar items. It features a simple structure, ease of use, small size, and clear reading. The product complies with the requirements of GB/T531-1999 (in China) and other relevant standards. It can be carried around for handheld measurement or installed on the matching SLX type Shore durometer frame for use. There are both pointer-type and digital display types available on the market, with several models including Shore A, C, and D (tip: when purchasing a Shore durometer, you can place the indenter tip on a smooth and clean glass. If the displayed value is exactly 100, then this durometer is accurate).
The Shore A durometer is mainly used for the hardness measurement of plastic synthetic rubber and other related chemical products (such as leather, polyurethane, wax, etc.).
The Shore C durometer is primarily used to measure the hardness of rubber or plastic cellular materials produced with foaming agents, where the stress at 50% compression is greater than 0.5 kgf/cm². It can also be applied to other materials with similar hardness levels.
The Shore D durometer is suitable for the hardness testing of general hard rubber, hard resin, acrylic, glass, thermoplastic plastics, printing plates, fibers, etc., which are high-hardness materials.
3.1 Principle of Shore Hardness Measurement
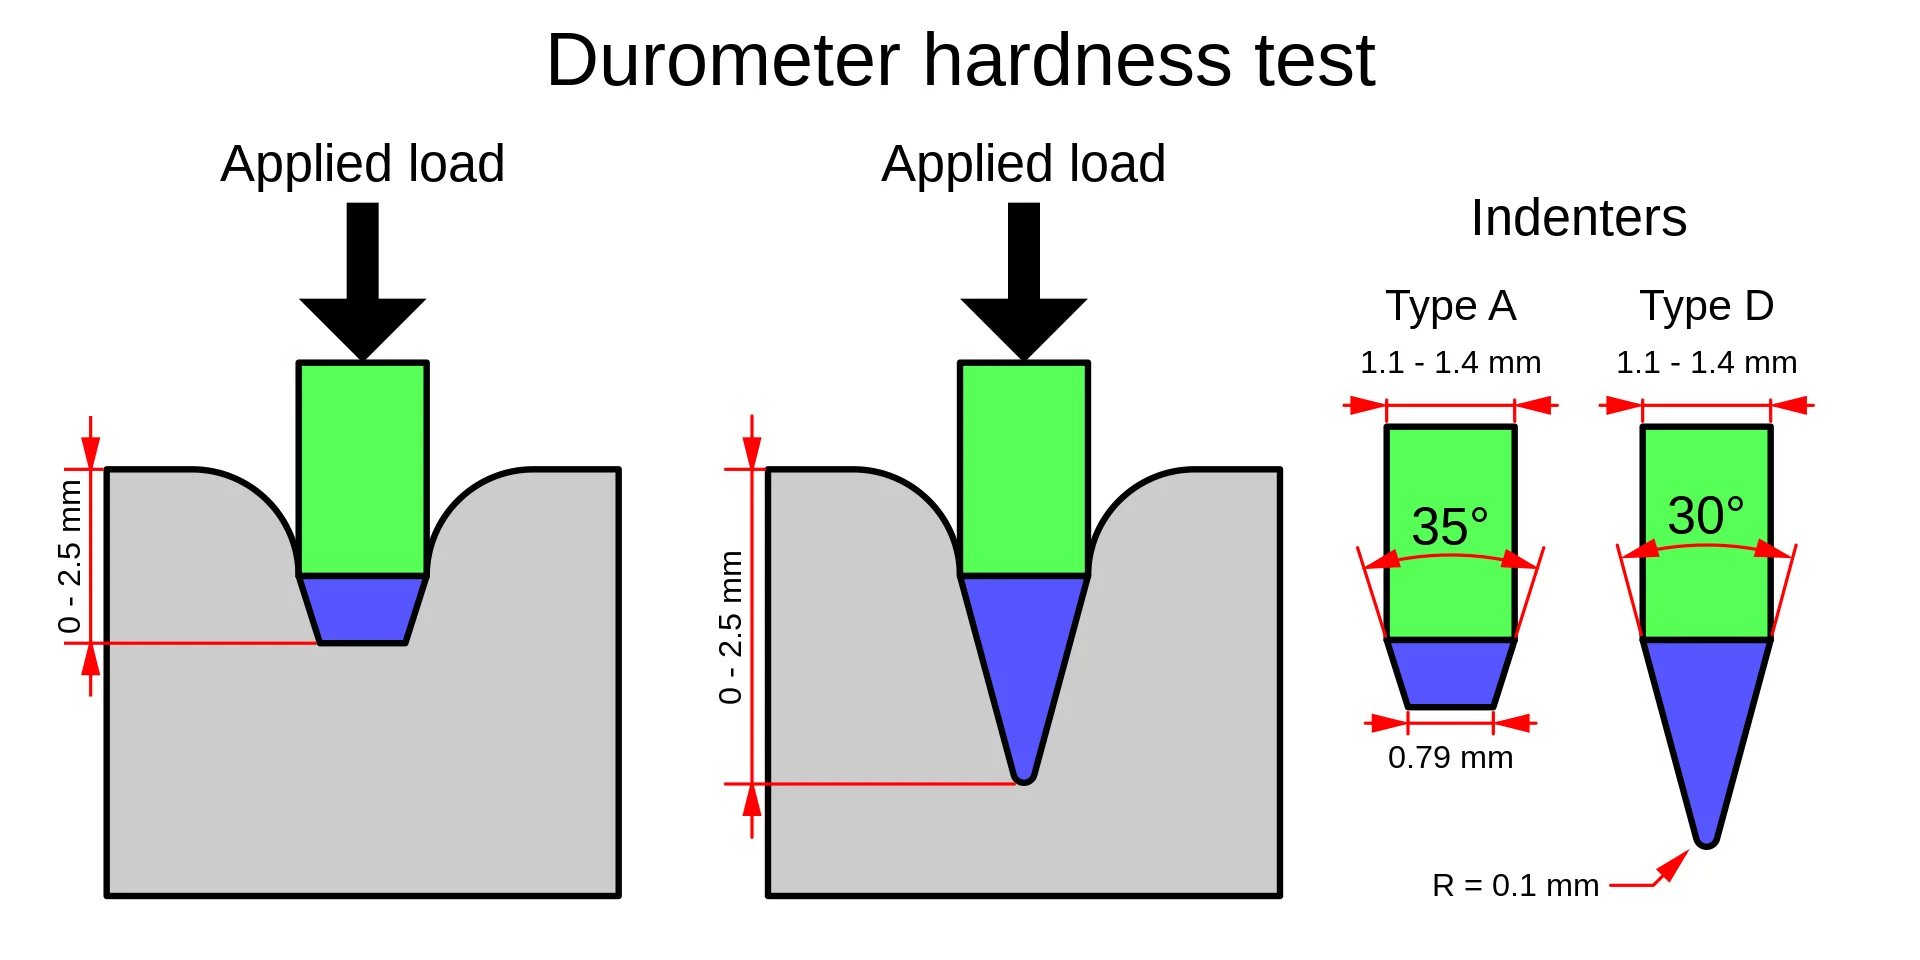
A steel indenter of a standardized shape is pressed vertically into the sample surface using a specified test force. When the surface of the indenter and the surface of the sample are completely adhered, there is a certain extension length L (that is, the depth that the indenter penetrates into the tested object) on the tip surface of the indenter relative to the press foot plane. The value of L is used to characterize the Shore hardness. The larger the value of L, the lower Shore hardness is, and vise versa. In China, the standards in this aspect adopt two types: HA and HD. Among them, HA is a hardness parameter for softer rubber (using an indenter with a 35-degree cone angle), and HD is a hardness parameter for harder rubber or plastic (using an indenter with a 30-degree cone angle).
Calculation formulas:
- HA = 100 – L
- HD = 100 – L /.
Conversion formulas:
- To estimate Shore Hardness (HS) using Brinell Hardness (BHN): HS = BHN ÷ 10 + 12
- To estimate Shore Hardness (HS) using Rockwell Hardness (HRC): HS = HRC + 15
- To approximate Brinell Hardness (BHN) from Vickers Hardness (HV): BHN ≈ HV ÷ 0.95 (this is a practical empirical approximation, not a strict standard conversion)
- To estimate Rockwell Hardness (HRC) using Brinell Hardness (BHN): HRC = BHN ÷ 10 – 3
3.2 Comparison of Common Shore Hardness Values
| Material / Product | Shore Hardness | Scale |
|---|---|---|
| Bicycle gel seat | 15–30 | OO |
| Sorbothane (soft grade) | 40 | OO |
| Sorbothane (general grade) | 30–70 | A |
| Rubber band | 25 | A |
| Door seal (car window weatherstrip) | 55 | A |
| Car tire | 70 | A |
| Soft skateboard wheel | 78 | A |
| Hydraulic seal | 70–90 | A |
| Hard skateboard wheel | 98 | A |
| Ebonite rubber | 100 | A |
| Solid truck tire | 50 | D |
| Hard hat (safety helmet) | 75 | D |
3.3 Shore A / C / D conversion table
| Shore D | Shore C | Shore A | Polymer / Notes |
|---|---|---|---|
| 90 | - | - | Hard plastics |
| 86 | - | - | |
| 83 | - | - | Medium-hard plastics |
| 80 | - | - | |
| 77 | - | - | |
| 74 | - | - | |
| 70 | - | - | |
| 65 | 95 | - | |
| 60 | 93 | 98 | Soft plastics |
| 55 | 89 | 96 | |
| 50 | 80 | 94 | |
| 42 | 70 | 90 | |
| 38 | 65 | 86 | Rubber |
| 35 | 57 | 85 | |
| 30 | 50 | 80 | |
| 25 | 43 | 75 | |
| 20 | 36 | 70 | |
| 15 | 27 | 60 | |
| 12 | 21 | 50 | |
| 10 | 18 | 40 | |
| 8 | 15 | 30 | |
| - | 11 | 20 | |
| 4 | 8 | 10 |
HA and HD operate on the same principle: under standard conditions, a standardized indenter is pressed into a specimen surface and the penetration depth is used to determine hardness. The difference lies in indenter shape: HA uses a truncated/conical-tipped indenter (suitable for softer plastics or rubbers), while HD uses a conical indenter (suitable for hard plastics and vulcanized rubber). There is no universal strict conversion between HA and HD. A common practical rule is to switch to HD when HA readings exceed ~90, and switch to HA when HD readings fall below ~20.
3.4 Shore Hardness Comparison with Common Objects
| Shore Hardness A | Shore Hardness D | Example Item |
|---|---|---|
| 20 A | – | Rubber band |
| 30 A | – | Mouse pad |
| 40 A | – | Rubber stamp |
| 50 A | – | Pencil eraser |
| 60 A | – | Running shoe sole |
| 70 A | – | Leather belt |
| 80 A | – | Soft skateboard wheel |
| 90 A | 50 D | Hard book cover |
| – | 60 D | Golf ball |
| – | 70 D | Landline phone casing |
| – | 80 D | Fountain pen body |
| – | 90 D | Bowling ball |
(Click to Enlarge)
4. How to Correctly Use and Maintain Your Shore Durometer
The most commonly used Shore durometers in China at present are these two pointer-types:
1) Shore A Durometer
2) Shore D Durometer
When using a Shore durometer, reading of the A-type under 10HA is inaccurate and cannot be used. When the reading exceeds 90HA, it is recommended to use the D-type durometer. However, due to users’ budget considerations, they usually only purchase the durometer but not the load frame, resulting in improper operation and thus a large deviation in the test results.
4.1 Requirements for sample inspection
Based on the actual application situation, we now provide the following methods for your reference:
1) Requirements for rubber samples and test temperature
① The thickness of the rubber sample should be no less than 6mm, the width should be no less than 15mm, and the length should be no less than 35mm. If the thickness is less than 6mm, the same film can be overlapped within 3 layers for measurement. And the film should be parallel to the top and bottom.
② During the inspection, the room temperature should be 23℃(±5℃), and the durometer should be stored at this temperature for at least 1 hour before measurement.
2) Requirements for plastic samples and test temperature
① The plastic sample should be a square with a side length of 50mm and a thickness of 6mm. 50×15mm sample is also allowed.
② Under possible circumstances, the sample should be adjusted to the laboratory standard temperature before testing. Comparative tests or series tests must be conducted at the same temperature.
3) The surface of rubber and plastic samples should be smooth, flat without mechanical damage, impurities or other defects.
4.2 Inspection of the durometer before measurement
Before measurement, it is necessary to check that the pointer should point to zero in the free state.
When used without a frame:
If the pointer deviates from zero, loosen the upper right tightening screw, rotate the surface, and align it with zero. Then press the indenter onto the glass plate, and when the end face of the pressure foot is in close contact with the bottom surface of the glass plate, the pointer should point to 100+/. If it does not point to 100+/, slightly press the indenter several times. If it still does not point to 100+/, then this durometer cannot be used.
When used on a frame:
Turn the handle to raise the worktable so that the pressure foot lifts and the end face of the indenter is in close contact with the surface of the glass worktable. Then the pointer should point to 100+/. If it does not point to 100+/, adjust the adjusting screw of the worktable plane. If the adjustment screw does not make the pointer point to 100+ after adjusting, it is recommended to send it to the production unit for adjustment.
4.3 The correct testing method
Place the sample on a sturdy flat surface, hold the durometer, and the footpiece’s central hole indenter should be at least 12mm away from the edge of the sample. Apply even pressure to the footpiece against the sample in a steady, vibration-free way, and maintain parallel alignment between the footpiece and the sample surface to guarantee the indenter penetrates the sample vertically. The force applied should be just enough to ensure that the footpiece and the sample are fully in contact. Unless otherwise specified, the reading must be taken within 1 second after full contact is established between the footpiece and the specimen; if readings are taken at other time intervals, this must be clearly stated. Measure the hardness value at least 5 times at different positions on the sample that are at least 6mm apart, and take the average value.

4.4 Maintenance for Shore durometers and related accessories
1) For the lifting spindle on the constant load measuring stand and the bottom of the workbench, please wipe them clean regularly and apply a small amount of anti-rust oil to prevent rusting.
2) After using the durometer, place it in the instrument case or box and store it in a dry place to prevent moisture damage.
3) After the durometer has been used 35,000 times, it is recommended to check the relationship between spring pressure and pointer scale, as well as the shape and dimensions of the indenter tip, in accordance with GB531 (in China) every approximately 10,000 uses thereafter.
Mastering Shore hardness measurement doesn’t have to be complicated – with the right tools, proper technique, and regular maintenance, you can ensure consistent, reliable results for every plastic product. Whether you’re testing soft TPU films or rigid PC parts, this guide will help you avoid common mistakes and make data-driven decisions.
Got questions? Share your experience with Shore hardness testing in the comments below, or reach out to our team for personalized advice on durometers or calibration. Our email: sales@kingstarmold.com