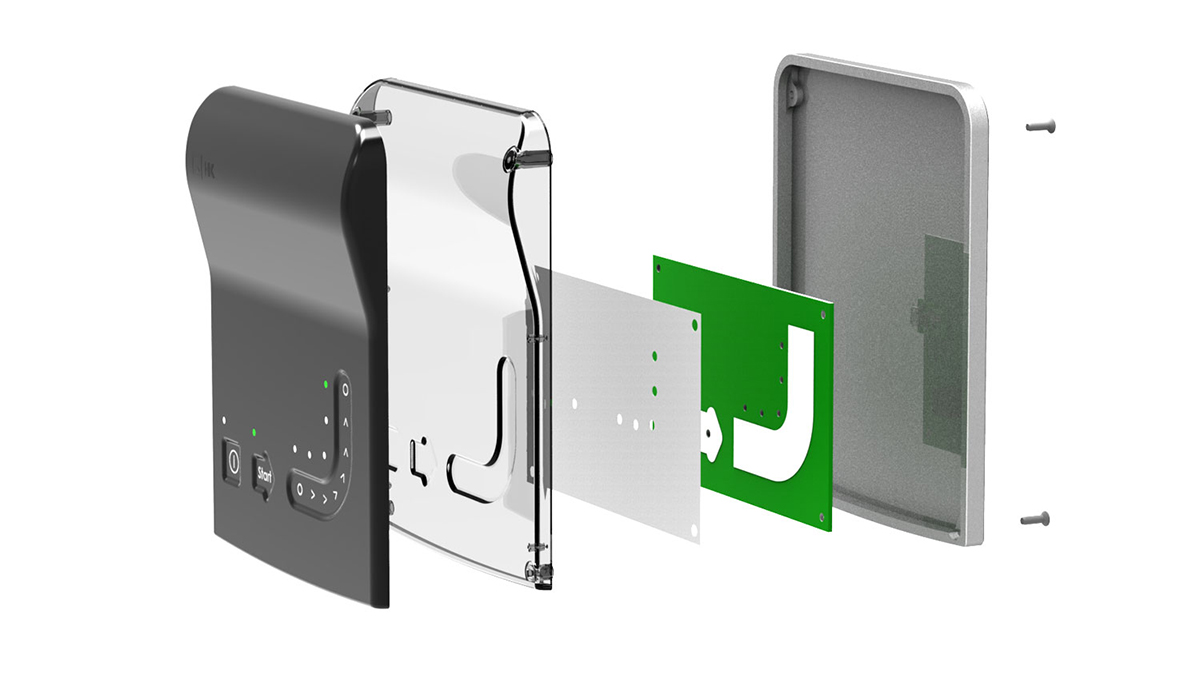
IMD&IML Injection Molding


KingStar Mold’s Quality Certification
Feel free to email us, and we’ll provide you with the original certifications upon request.
- ISO 9001: Establishes the criteria for a quality management system, essential for injection mold companies to ensure consistent quality.
- ISO 13485: Defines the requirements for a quality management system specifically for medical devices and related services, ensuring compliance with customer and regulatory needs.
- ISO 14001: Specifies the standards for an environmental management system, promoting sustainable and certified practices.
- ISO 45001: Reflects our commitment to maintaining a safe and healthy workplace. This certification ensures peak team performance, resulting in superior product quality and faster production times for our customers.

Resources for The Guide Throughout the Whole process to PVC Injection Molding
What is IMD?


The guide of IMD injection mold design and molding process

By adhering to these steps and principles, you can ensure high-quality sheet forming and injection molding for IMD applications.
What are the characteristics of IMD injection molding?
① The product offers exceptional durability and scratch resistance.
② Complex visual designs can be easily achieved with consistent results, something other processes cannot match.
③ It supports a wide range of colors, even in small production runs, including the ability to print over four colors and metallic inks.
④ Design changes can be made without requiring additional molds, leading to substantial cost reductions.
⑤ One-piece molding exclude the need for color separation and disassembly, accelerating the design and development process.
⑥ The product features high color contrast, and the plastic material allows light transmission, making it ideal for screens and light guide columns.
⑦ The product has excellent chemical resistance due to its extremely durable and flexible surface printing. The image is actually printed on the inside of the film.
⑧ Plastics and films can be recycled and reused.
⑨ The product can meet precision requirements and enable efficient mass production through automation.


The top tips for IMD injection molding
Since IMD ink can withstand temperatures between 250-260°C for 3-4 seconds, designing the injection mold requires careful consideration of factors such as injection pressure, injection time, gate size and quantity, and the material’s physical properties. To achieve low injection pressure and short injection times, the following methods can be considered:
① A shorter runner design is preferable, with hot runners being the ideal choice.
② Consider increasing the gate area or using multi-point gates.
③ Opt for plastics that have better flow and inject them at a lower temperature.
④ To prevent ink from being flushed out, add it at the gate.
⑤ Ensure that the IMD injection mold cavity and mold shape align properly.
⑥ Avoid selecting the highest stretch points for the injection material, usually at the four corners, as these areas are thinner, expand and contract more, and are prone to wrinkles.
⑦ Since IMD injection conditions tend to be consistent, using an injection molding machine with superior control is recommended. Additionally, the plastic’s physical properties should be uniform.
⑧ Since the FILM expands and contracts with temperature changes, the mold temperature should not be too high during molding. Using a mold temperature machine is a good approach.
⑨ The presence of film inside causes thicker areas to shrink more. Traditional methods like holding pressure and overpacking won’t solve the shrinkage issue. The solution lies in reducing the material and making the part hollow.
IMD Injection Molding: Common Problems and Solutions
IMD (In-Mold Decoration) injection molding is a sophisticated process that demands accurate control over multiple variables to achieve optimal results. Here are some common challenges encountered in IMD injection molding and their corresponding solutions:
| Common Problems | Causes and Solutions |
The pattern ink is scattered (washed) away during IMD injection molding | IMD ink is dry and doesn't let anything through. It has leftover solvents and air bubbles. When you're injection molding, the ink spreads and doesn't stick to the sheet as well. |
| IMD silver ink takes longer to dry | |
| As the IMD sheet gets thicker, the area where the ink spreads out gets bigger. | |
| It depends on whether the gate design has a good structure, shape, and distribution. | |
| It depends on the plastic temperature. When the injection resin temperature goes up, the area that gets washed away goes down. The temperature setting depends on the plastic type and injection mold structure. | |
| IMD ink layer printed too thin | |
| IMD ink itself is not resistant to high temperatures | |
| Failure to dehumidify the plastic before injection molding leads to the formation of bubbles during the process. | |
Incorrect viscosity adjustment of the ink prior to screen printing causes pinholes and uneven leveling in the ink layer. |
|
IMD doesn't stick very well and the sheet comes apart easily. | There is residual solvent in the ink |
| The pressure, temperature, and cooling system of the injection molding machine are not properly regulated. | |
| The silver ink is either overly saturated or incompatible with the injection molding process. | |
| The ink doesn't stick to the substrate very well. | |
| No printed IMD water-based adhesive | |
| Mirror ink is too close to the curved edge | |
| The plastic has moisture in it. | |
| The adhesion of ink is related to the temperature of injection resin | |
Mirror ink has no mirror effect | The sheet (substrate) can't handle the solvents in the mirror ink. |
| It should be dried immediately after printing | |
| Mirror ink should be printed with water-based adhesive | |
| To make the ink stick better and get a mirror effect, add a hardener to the water-based adhesive. But use it all up within two hours of adding the hardener. | |
When embossing, the ink breaks | The corner of the punch is too sharp and should have a certain arc. |
| The ink isn't soft enough. | |
| Improper viscosity adjustment of the ink can lead to issues... For instance, ink that dries too slowly may cause smudging during the process. |

Resources for The Guide Throughout the Whole Process of IML Injection Molding Manufacturing

What are the process steps of IML injection molding?
Trimming → Surface printing → Ink drying and setting → Applying protective film → Drilling positioning holes → Heat forming → Shaping peripheral edges → Injection molding procedure. The specific instructions are as follows:
- Cutting: Cut the rolled film into square blocks of the specified size for use in the printing and molding processes.
- Flat Printing: Print the required icons and text onto the cut square film to create the film web.
- Ink Drying and Fixing: Place the printed film squares in a high-temperature oven to dry and fix the IML ink.
- Apply Protective Film: Apply one or two layers of protective film to prevent surface scratches during the punching of positioning holes.
- Punch Positioning Holes: Accurately punch the positioning holes required for thermoforming. In some cases, the holes for the shearing process may need to be punched in advance.
- Thermoforming (High Pressure or Copper Mold): After heating the printed film, use a high-pressure machine or copper mold to shape the film while it is still hot.
- Cut the Peripheral Shape: Trim off the excess material from the formed three-dimensional film to create the desired shape.
- Injection Molding Process: Place the molded film, which matches the exact three-dimensional shape of the front mold, onto the front mold and proceed with the injection molding to complete the IML product.
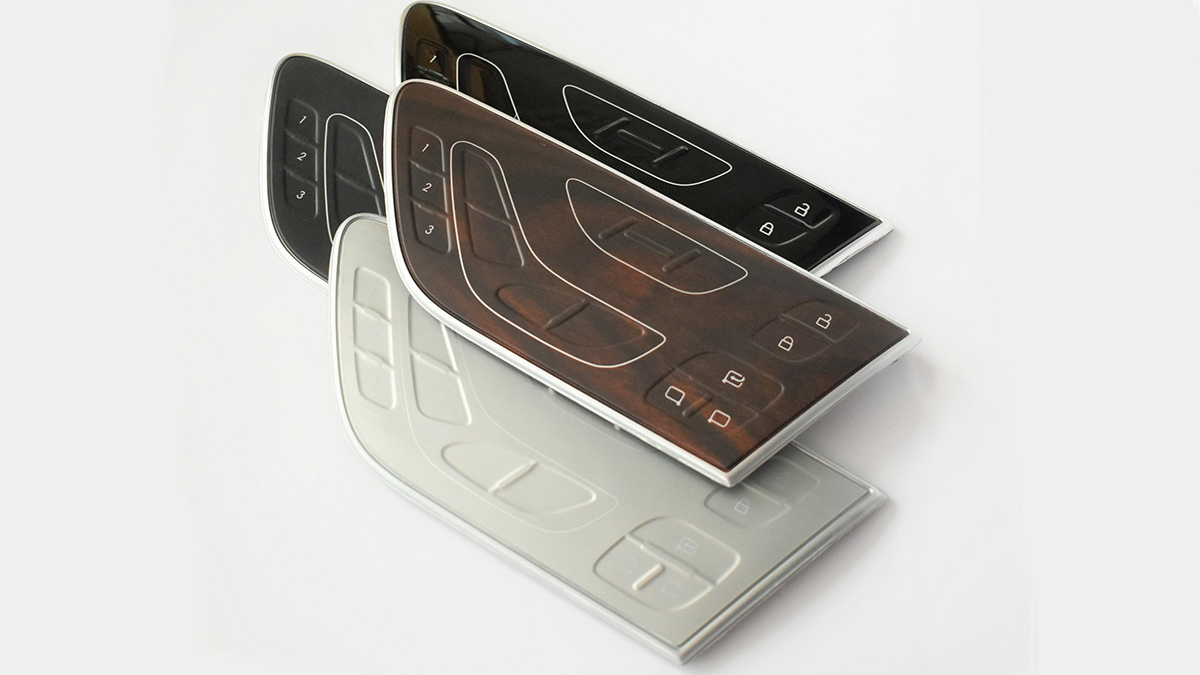
IML Injection Molding VS IMD Injection Molding
IML (In-Mold Labeling) and IMD (In-Mold Decoration) are widely used technologies in the packaging industry for decorating and labeling plastic products. While they share similarities, they differ in application and functionality. Below is a comparison of their key characteristics:
| IMD Injecton Molding | IML Injecton Molding |
| IMD is suitable for large batches (100,000 or more) | IML production batch quantity is very flexible |
IMD products with three-dimensional molding height of IMD pattern not exceeding 1.5MM | IML technology is capable of handling diverse and intricate 3D productions, including flat surfaces, curved designs, and hemming applications. The molding height for 3D patterns can extend up to 40mm. |
IMD products, because the ink is screen-printed on the surface, the fonts are not easily touched. | IML ink is screen-printed in the middle layer, so the appearance is smooth and beautiful, the more you touch it, the brighter it becomes. It has excellent scratch resistance, and the pattern and color can be changed at any time during production. |
| IMD can only screen print the same process as hot stamping paper, and cannot change its screen printing color. | IML's ink colors are unlimited, and the screen printing color can be changed at will in the same batch of production. |
| IMD cannot make button products | IML can make products with buttons |
| IML has a relatively short development cycle, as molds for shaping, cutting, and injection can be developed concurrently alongside auxiliary processes. This efficiency allows for the simultaneous production of multiple components, reducing overall costs. Moreover, the absence of hooks enables the creation of thinner products. | The overall development time of IMD is longer |


How to test and verify IML products?
Testing and verifying IML (In-Mold Labeling) products is crucial to ensure they meet required standards and specifications. Here are key methods to test and verify IML products:
- Hardness Test: Use a polished 2H~3H pencil with a 500g force and push it flatly towards the surface of the product at a 45-degree angle. If the surface shows no obvious scratches or marks, it is considered qualified.
- Temperature Test: Place the product in a furnace with a relative humidity of 95%-100% and a temperature of 57±3°C for 48 hours. If there is no bursting, discoloration, deformation, color loss, or loss of function, it passes the test.
- Wear Resistance Test: Rub a rubber with a 500g weight back and forth 300 times (one back and forth equals one cycle) at the same spot, with a length of 2 inches. If no obvious wear or degradation occurs on the surface, it is considered qualified.
- Sand Washing Test: The fixed test coating is placed at a 45-degree angle with the friction instrument. The coating surface is washed using the specified sand amount and flow rate (2 liters/21~23.5 seconds) until 500ml of sand grains have been applied. If the material beneath the paint becomes visible after washing with 500ml of sand, it is considered a serious defect. If it becomes visible after 100ml of sand, it is considered a minor defect; If minor defects exceed 20% of the total samples or if serious defects exceed the total number of samples, the product is considered unqualified.
Knowledge About IMD&IML Injection Molding