When it comes to getting the most out of your cooler, it’s not just about loading it with ice and hoping for the best. The way you use ice—how much, what kind, and where you place it—can make or break your cooler’s performance. Whether you’re camping for a weekend or keeping drinks cold at a backyard BBQ, proper ice use can mean the difference between chilled perfection and a soggy mess.
As a leading wholesale cooler manufacturer, we’ll walk you through everything you need to know about using ice in your cooler like a pro. From the golden 2:1 ice-to-contents ratio to the smart use of block vs. cubed ice, layering strategies, dry ice safety, and clever hacks to stretch your ice retention—we’ve got it all covered. Whether you’re using a rugged rotomolded cooler from us or any high-performance cooler(RTIC, YETI, Igloo…), these tips will help you keep things icy longer.
What’s the most common mistake cooler users make? Surprisingly, it’s not using too little insulation or opening the lid too often—it’s simply not packing enough ice. Understanding the ideal ice-to-contents ratio can dramatically improve your cooler’s performance.
1.1 Why the 2:1 Ratio Works
The general rule of thumb is simple: pack twice as much ice as the contents by weight. While it might sound excessive, this ratio is based on how heat transfer works inside a closed system.
- Higher thermal mass: More ice holds more cold energy. When the surrounding temperature rises or the lid opens, a large mass of ice resists temperature swings better than a small one.
- Minimized air pockets: Ice takes up space, which means there’s less room for warm air to linger. Less air = less warming.
That’s why many rotomolded coolers are designed with this ratio in mind—deep interiors and thick insulation make room for more ice without sacrificing storage efficiency.
1.2 When to Bend the Rules
Of course, the 2:1 guideline isn’t written in stone. There are a few cases where you can get away with less:
- Day trips or picnics: If you’re only heading out for a few hours, a 1:1 ratio will usually keep drinks cold and sandwiches safe.
- Pre-frozen or pre-chilled contents: If your meats or beverages are already cold, the initial cooling demand is lower. You can adjust your ice load accordingly.
- Space constraints: Smaller coolers or over-packed containers may not physically allow for a 2:1 ratio. In these cases, using block ice or reusable ice packs is a smart alternative—they melt slower and offer longer cold retention in less space.
1.3 Not All Ice is Equal
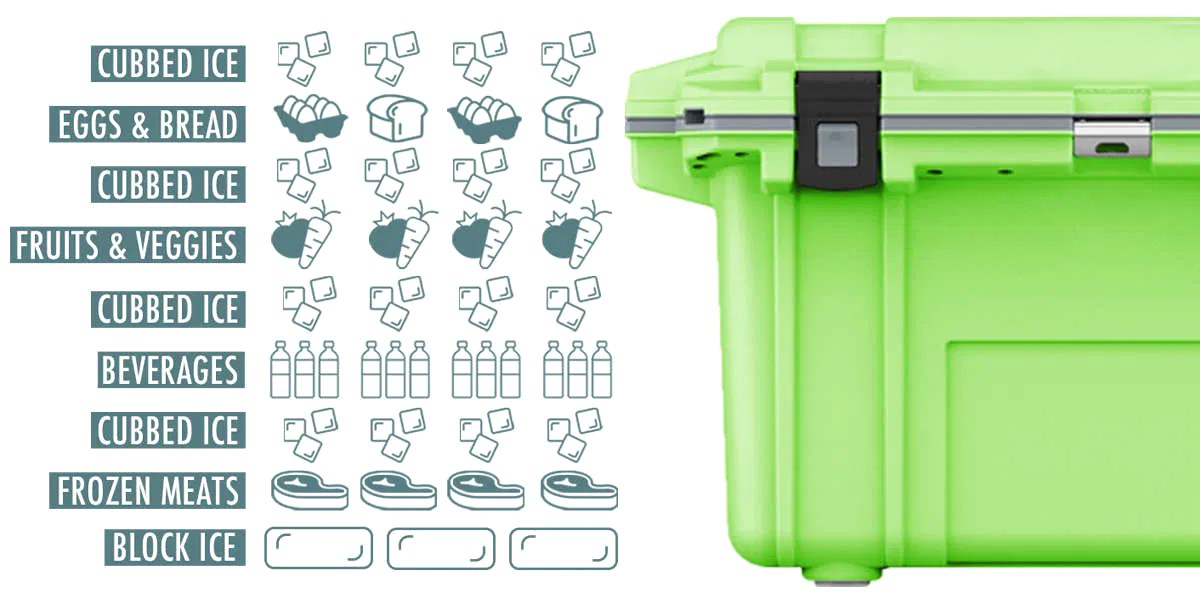
Another factor worth noting: the type of ice can influence how well this ratio works. Loose ice cubes melt quickly and fill gaps, but block ice lasts much longer. A smart trick is to layer block ice at the bottom and fill in gaps with crushed ice or cubes. It’s the best of both worlds.
2. Know Your Ice: Pick the Right Chill for the Job
Ice isn’t just frozen water—it’s a strategic tool. Depending on what you’re packing, how long you’re out, and whether you value convenience or endurance, choosing the right ice type can dramatically improve cooler performance.
2.1 Block Ice: Your Foundation for Cold That Lasts
If you’re planning a multi-day trip, block ice should be your go-to base layer. Its dense mass and low surface area slow down melting significantly, acting like a cold battery that releases chill gradually.
- Works best when packed at the bottom of the cooler
- Ideal for keeping meat, frozen food, or drinks cold for 2–5 days
- Combine with smaller ice types to balance long-term retention and quick access cooling
Want real-world performance? Most experienced cooler users layer block ice with cubed ice or gel packs—using the block for staying power and cubes for rapid chilling.
2.2 Cubed Ice: Great for Fast Cooling—but Don’t Count on It Overnight
Cubed ice is everywhere for a reason. It chills quickly and fills odd gaps in your cooler layout—but it’s a short-term solution.
- Quick cooling power: Ice cubes have a lot of surface area, which makes them excellent for rapidly chilling warm drinks or snacks.
- Melts fast: The downside? That same surface area means they also melt quickly.
- Best use case: Ideal for short trips, beach days, or topping off a cooler that’s already cold.
Pro tip: Freeze water bottles instead of loose cubes for a dual-purpose cooling solution—you get ice that doesn’t flood your cooler, and drinkable water once it melts.
2.3 Ice Packs: Convenience Over Customization
Reusable ice packs are a solid option for cooler users who value tidiness and minimal fuss.
- No meltwater = no mess
- Designed to freeze below 32°F, extending cold retention slightly
- Easy to position, reuse, and clean
That said, they don’t always outperform block or cubed ice in terms of thermal mass. They’re best used in combination or for short to mid-length trips where maintenance-free cooling is the goal.

2.4 Dry Ice: Extreme Chill for Serious Needs
For those transporting frozen meat, medical supplies, or anything that must stay frozen—not just cold—dry ice is in a class of its own.
But it’s not for casual use, handling dry ice safely requires insulated gloves and proper ventilation, as the carbon dioxide gas can build up pressure or displace oxygen in confined spaces. Never seal it in an airtight cooler. Also, not every cooler is equipped to handle dry ice’s extreme cold, but your coolers(Yeti, Igloo, RTIC…) are usually fully dry ice–compatible, featuring rugged rotomolded construction and built-in pressure-release flexibility. For high-stakes cooling, this is the professional’s choice.
3. Pre-Chill Everything for Maximum Efficiency
One of the most overlooked tricks to better ice retention is starting cold. Think of your cooler as a refrigerator—not a freezer. If you load it with warm drinks and room-temp snacks, it first has to cool them down before it can start keeping them cold. That burns through ice fast.
3.1 Start with the cooler itself.
Before your trip, pre-chill the empty cooler at least several hours in advance. The easiest method? Dump in a bag or two of cubed ice the night before. This brings down the internal temperature and prevents your real ice (the one meant to last) from melting immediately on contact with hot plastic walls.
3.2 Don’t forget the contents.
It’s not just about the cooler—your food and drinks should also go in cold. Throw your beverages in the fridge the night before, or even the freezer for 30–60 minutes before packing (just don’t forget them!). Meats, cheeses, and frozen treats should be as close to their storage temp as possible when loaded.
Pro tip: If you’re packing in hot weather, pre-chilling becomes even more critical. Think of it as giving your cooler a head start in the race against heat.

4. Combine Ice Types for Best Results
The secret to a longer-lasting chill isn’t just in how much ice you use—it’s in what kind of ice you use and how you combine it. Block ice is your foundation: large, solid, and slow to melt, it acts like a cold battery that steadily regulates the temperature inside your cooler. But it’s not enough on its own.
That’s where cubed or crushed ice comes in. It fills the spaces around food and drinks, offering quick, surface-level cooling. This rapid chill is perfect for items you plan to access early or often. Layering cubed ice on top of block ice—or even scattering it throughout—helps maintain an even temperature while also cushioning your perishables.
Reusable ice packs or frozen water bottles are great add-ons. They stay colder than cubed ice, won’t create puddles as they thaw, and they’re perfect for topping off your load. Just be sure to fill any remaining air gaps, especially near the top, with extra cubed or crushed ice. Remember: air is the enemy of cold retention. The fewer empty spaces, the longer your cooler will stay icy.
5. How to Make and Store Enough Ice
When preparing for a trip with a cooler, ensuring that you have enough ice is essential for maintaining cold temperatures throughout the journey. Here’s how you can make and store ice efficiently to ensure everything stays cool:
5.1 DIY Block Ice
One of the best ways to ensure long-lasting cold retention is to create your own block ice. Block ice melts much slower than cubed ice, making it ideal for extended trips.
- Containers to Use: You can use empty plastic milk jugs, water bottles, or even large plastic tubs to create block ice.
- Freezing Tips: Remember to leave some space at the top of the containers to allow for the expansion of water as it freezes. This will prevent cracks and damage to your containers.
- Longer Cold Retention: Block ice is great for maintaining cold temperatures for several days, ensuring that your cooler stays effective over longer periods.
5.2 Buying Ice from the Store
If you’re looking for convenience or are in a hurry, purchasing ice from a local store is always an option. Grocery stores and gas stations often sell bags of cubed or crushed ice, which are easy to find. Cubed ice melts faster, but it’s readily available and useful for quick trips. When you’re buying ice, consider buying it in bulk to make sure you have enough to last through your trip.
However, if you’re planning on a longer journey, it’s still wise to combine cubed ice with block ice to maximize cooling efficiency. You can also consider adding frozen water bottles or ice packs to the mix for longer-lasting cold retention.
5.3 Storing Ice for Multi-Day Trips
For trips that last several days, you’ll need to carefully store ice to maintain the cold temperature. Here’s how you can ensure your ice lasts:
- Freezing Water Bottles: Freeze extra water bottles and ice packs to help supplement your ice. These items will last longer than cubed ice and can help keep the temperature lower for longer.
- Reserving Extra Ice: If your cooler is small and you can’t fit all the ice you need, keep some extra ice in reserve. You can replenish the cooler mid-trip by replacing the melted ice with fresh blocks.
- Layering: Layer ice between food and drinks in your cooler. Start with a layer of block ice, followed by food and drinks, and then top it off with more ice. This helps maintain consistent cold temperatures.
6. Using Dry Ice Safely and Effectively
Dry ice is ideal for extreme cooling, especially when you’re transporting frozen goods like meats or medical supplies. It can keep things colder for much longer than regular ice, but it’s also more challenging to use. Here’s how to make the most of it while staying safe:

6.1 When to Use Dry Ice
Dry ice is your go-to option for long trips or when you need to keep goods frozen. If you’re hauling items like frozen meats or other perishables that must stay solidly frozen—not just cold—dry ice is the best choice. It’s ideal for any situation where extended, sub-zero temperatures are necessary.
6.2 Dry Ice Safety Tips
Handling dry ice requires extra care due to its unique properties. Here’s how to use it safely:
- Wear Insulated Gloves or Mitts: Always use insulated gloves or mitts when handling dry ice to prevent cold burns or skin damage. Its temperature can cause severe injury if it comes into direct contact with skin.
- Ensure Proper Ventilation: Dry ice sublimates into carbon dioxide gas, which can accumulate in enclosed spaces. Always use dry ice in well-ventilated areas to avoid dangerous buildup of gas, which can lead to asphyxiation.
- Avoid Airtight Containers: Never store dry ice in a completely airtight cooler. As it sublimates, it generates gas, which could increase pressure and cause the cooler to burst. Use a cooler designed to handle this pressure or opt for a cooler with a venting mechanism.
- Ventilate the Area Around the Cooler: If you’re transporting dry ice in a vehicle, ensure the area around the cooler is well-ventilated. When driving, the vehicle’s sealed environment can concentrate carbon dioxide gas, posing a risk if not properly ventilated. Always crack a window or ensure airflow to avoid dangerous gas buildup.
6.3 Placement and Layering Strategy with Dry Ice
To maximize efficiency, dry ice should be placed at the bottom of your cooler, as it will cool the contents more effectively from the bottom up. Always place a protective layer, such as cardboard or a towel, between the dry ice and your cooler to prevent direct contact. Then, add regular ice (cubed or block) on top to balance the cooling power and maintain safe temperatures. This method creates an optimal cooling effect, where dry ice handles the deepest chill while regular ice manages the overall temperature.
7. Smart Packing Tips to Retain Cold
Efficiently packing your cooler not only helps keep things organized but also maximizes the cold retention. Here’s how to do it right:
- Organize Contents by Usage Frequency: Prioritize items based on when you’ll need them. Store the things you’ll access less frequently (like drinks or extra snacks) at the bottom of the cooler, leaving the more frequently used items (like perishable foods) on top. This ensures minimal disruption to the cold layers when you open the cooler.
- Keep the Cooler Closed: The golden rule to keeping things cold is “open less, chill more.” Every time you open the cooler, cold air escapes, and the temperature inside rises. Plan ahead so that you only open the cooler when absolutely necessary, keeping it sealed for as long as possible to retain its cold temperature.
- Avoid Over-Packing and Leaving Too Much Air Space: Packing too tightly can cause poor airflow, reducing the cooler’s efficiency. On the other hand, leaving too much air space wastes the cooling potential of the ice. Aim for a snug fit, where the contents are secure but not overly compressed, ensuring that air can circulate for optimal cooling
8. Reusable Ice Packs: Worth the Investment?

8.1 Tip 1: Pros of Ice Packs
Reusable ice packs offer consistent cooling without the mess of melting water. They are durable for multiple uses and more compact than traditional ice, allowing for better organization inside the cooler.
8.2 Tip 2: When to Pair Them with Traditional Ice
Ice packs work best when used alongside traditional ice. Use ice packs for items that don’t require direct contact with ice, while relying on block or cubed ice for the majority of your cooling needs. This approach maximizes cold retention and saves on ice consumption, especially for extended trips.
8.3 Tip 3: Cost vs. Performance Considerations
Though reusable ice packs are more expensive upfront, their durability makes them cost-effective in the long term. If you frequently use a cooler, investing in high-quality ice packs could save you money by reducing the need for constant ice replenishment. For occasional use, traditional ice remains the cheaper option.
9. Environmental and Practical Cooler Hacks
9.1 Freeze Water Bottles for Dual-Use
Instead of filling your cooler with just ice, freeze water bottles. They’ll keep your items cool while doubling as drinking water once they melt. This hack not only saves space but also reduces the need for extra ice, especially on longer trips.
9.2 Insulate with Towels or Foam Mats
Boost your cooler’s efficiency by adding insulation around the contents. Towels or foam mats can act as additional barriers against heat, preventing the cooler from warming up too quickly. Simply wrap the items inside the cooler or layer them at the bottom for extra protection.
9.3 Use Reflective Covers or Shade to Reduce External Heat
Keep your cooler cool on the outside by protecting it from the sun. Reflective covers or simply placing the cooler in the shade will help reduce the amount of heat it absorbs, maintaining a lower internal temperature for longer periods.
10. Final Tips for Long-Lasting Ice Retention
10.1 Tip 1: Drain Meltwater or Keep It?
There’s a debate about whether to drain meltwater or keep it in the cooler. See the Pros and Cons table below for detail, arrange the meltwater as you need.
| Aspect | Pros | Cons |
| Effect on Ice Retention | – Draining prevents water from accelerating ice melting, helping to retain ice longer. – Keeps ice dry, reducing surface contact and prolonging its effectiveness. | – Draining may reduce the insulation effect of the water, leading to faster ice melting. – Requires regular draining, which adds complexity. |
| Impact on Cooler Cleanliness | – Draining helps keep the cooler clean and prevents food and drinks from getting contaminated by water. – Reduces the risk of bacteria and odor buildup. | – Draining can cause ice to melt faster, shortening its retention time. – It can make the cooler contents wet. |
| Ease of Maintenance | – Regular draining reduces the hassle of cleaning up water accumulation, keeping the cooler dry. – Ideal for outdoor activities and extended use. | – Requires more attention and maintenance, as frequent draining may interrupt the activity. – Can leave water residue behind, affecting food quality. |

10.2 Tip 2: Keep the Cooler Out of Direct Sunlight
This is one of the easiest ways to improve ice retention. Sunlight directly affects the cooler’s internal temperature, causing the ice to melt faster. Keep your cooler in shaded areas or use a reflective cover to minimize exposure to direct sunlight, keeping everything inside cooler for longer.
10.3 Tip 3: Monitor Internal Temp with a Thermometer
Investing in a thermometer allows you to track the temperature inside the cooler. By monitoring it, you can ensure your food and drinks stay at the ideal temperature and adjust ice management strategies as needed. This simple tool can make a big difference, especially during long trips.
Conclusion
In this guide, we’ve covered the essential principles for maximizing your ice retention, including ice-to-contents ratios, the right types of ice, layering strategies, and smart packing tips. Whether you’re embarking on a long outdoor adventure or need your cooler to stay cold for a weekend barbecue, understanding how to properly manage ice can make a significant difference.
We encourage you to experiment with these methods to discover what works best for your specific needs. Every cooler and situation can be a little different, so testing various strategies will help you perfect your cooling game.
If you’re looking for high-quality, durable coolers that can handle all these techniques and more, our factory-direct coolers provide excellent insulation and reliability, making them a smart choice for all your chilling needs.