A lukewarm drink or a soggy sandwich can ruin even the best outdoor trip—and it all comes down to how you pack your cooler. Get it right, and ice stays solid for days, keeping food fresh and drinks frosty. Get it wrong, and you’ll be stuck with slush by noon.
This article will share some general packaging tips for keeping ice longer in your cooler, regardless of the brand.
Short on time? Prioritize these 3 steps: Pre-chill the cooler, pack only frozen/cold items, and fill all gaps with ice – they account for 70% of ice retention success in tests.
For full details, please read on.
If you don’t clean out the remaining food residues or other dirt in the cooler before using it, these substances will breed bacteria in the fresh food and beverages you put in later. This is not only bad for your health, but the process of bacteria and mold growth will release a small amount of heat, causing the ice cubes to melt faster.
According to food safety research from the University of Georgia (2023), this micro-heating can accelerate ice melt by up to 10%.
To clean effectively:
- Use mild dish soap (like Dawn) – harsh chemicals may damage the interior or leave lingering scents.
- Scrub corners, lid seals, and drain plugs thoroughly—these spots trap the most gunk.
- Rinse off all the soap and open the lid to let it dry completely before packaging.
Following these three steps should be enough to handle most situations. If not, here is a more detailed guide for more stubborn stains for your reference: how to clean your cooler.
2. Pre-Chill the Cooler First
A pre-chilled cooler is key for keeping ice intact longer. Even high-quality rotomolded or injection-molded coolers will waste ice if packed while warm. We all know that high-quality coolers have excellent insulation properties. However, if you don’t pre-cool them before use, this can actually become a drawback instead. Think like this: Put ice cubes in a basket with four sides open, and the warm air will immediately escape. In the airtight cooler, however, the warm air has nowhere to escape and can only remain inside, consuming the ice to lower its temperature.
So don’t skip this step, especially for multi-day trips.
How to do it:
Bring the cooler indoors 12–24 hours before packing. Add 10–20 pounds of “sacrificial ice” (extra ice to cool the cooler itself) – adjust the amount based on its size. This ice absorbs residual heat in the walls.
Keep the cooler out of direct sun while pre-chilling to avoid undoing your work. Once time’s up, drain meltwater and discard leftover ice. Now it’s ready to hold your items.
In 2024 summer tests, a pre-chilled 50-quart cooler retained ice 30% longer than an unchilled one in 85°F weather. Using 15 lbs of sacrificial ice for 24 hours dropped the interior temp from 75°F to 38°F—critical for slowing initial melt.
3. Nail the Ice-to-Goods Ratio
It’s not just about how much ice you use—it’s about balancing it with what you’re packing. Get this right, and your ice will last far longer.
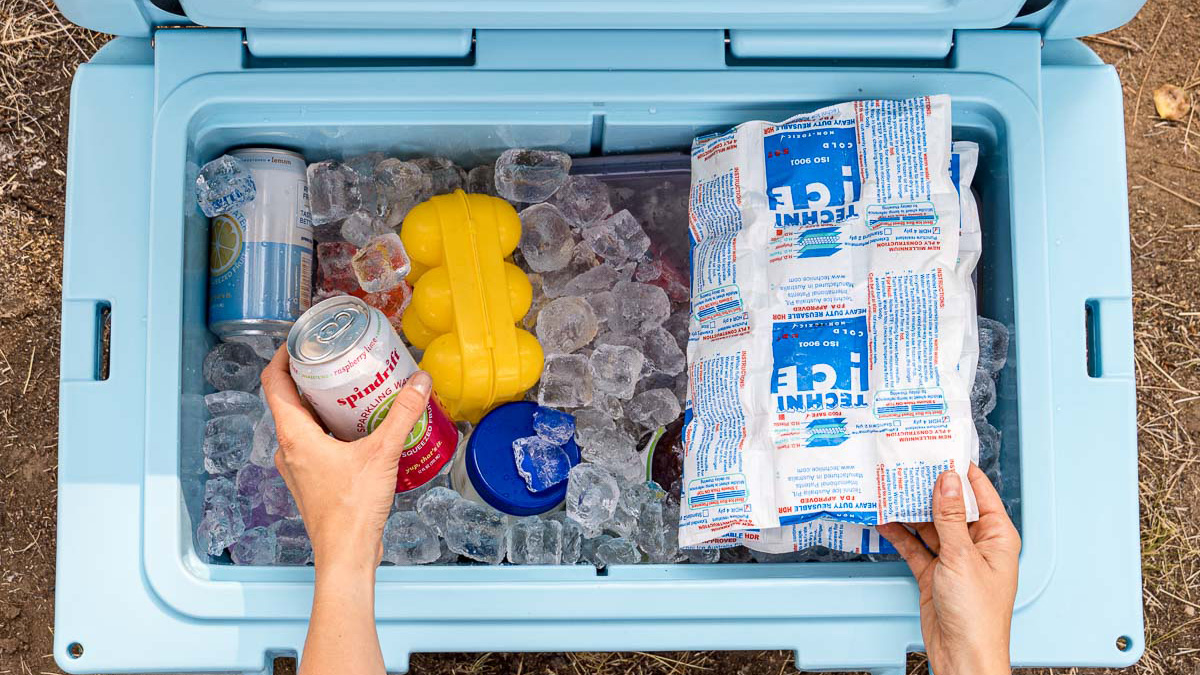
Stick to a 2:1 ratio—twice as much ice as food/drinks by volume. Ice acts as a “cold reservoir”; more ice means slower melting, even when the lid is opened.
That’s exactly why so many outdoor experts are so keen on using the super huge coolers. “How long do they plan to stay in the wild anyway with so much food? That’s right, two-thirds inside the cooler are ice!
By the way, block ice melts slower than cubed ice because it has less surface area exposed to warm air. According to Outdoor Gear Lab (2024), a 10lb block melts at ~0.5 lbs/hour in 75°F conditions, while 10lbs of cubed ice melts at ~1 lb/hour.
So mix block and cubed ice for best results:
- Block ice: Great for long trips as a slow-melting “base” of cold.
- Cubed ice: Fills gaps around items to prevent warm air circulation.
Fill every empty space! Use small ice cubes or frozen water bottles to plug gaps—they double as drinking water once thawed.
In a 3-day camping test, a 2:1 mix (20 lbs ice + 10 lbs goods) kept temps below 40°F the entire time; a 1:1 mix hit 50°F by day 2, risking food safety.
4. Prep Food Before You Pack
Efficient cooler packing starts in the kitchen, not at the campsite.

- Chop, portion, and simplify: Large, irregularly shaped veggies, meats, or fruit waste space. Chop into usable sizes and portion meals by day in bags or containers—this saves work both for you and for the ice by avoiding digging.
- Stop leaks: Use leak-proof containers or vacuum-sealed bags for sauces, marinades, or pre-cooked dishes. They prevent cross-contamination and keep things organized.
- Save space with tricks: Instead of bulky egg cartons, crack eggs into a clean, sealable bottle (add milk and seasoning for ready-to-scramble breakfasts).

5. Only Pack Cold or Frozen Stuff
One of the easiest ways to extend ice life is to ensure everything going into the cooler is already cold or frozen.
If your items have already reached the desired low temperature before packaging, then your ice cubes won’t need to work overtime. Chill drinks, meats, fruits, and snacks first—freeze them if possible. Frozen items (like pre-frozen meals or water bottles) act as extra ice, slowly thawing to keep things cold.
Never add room-temperature items, because they raise the cooler’s temperature and force ice to melt 3x faster. Ever noticed when you put ice cubes directly into the tap water, they melt within a few minutes, but the ice cubes in Starbucks’ iced coffee can last for a long time? Same reason. Keep items cold before packing, and your ice will last much longer.
6. Layer Contents Strategically
You can’t just eat frozen meat and fish during the entire camping, can you? But if you mix eggs, vegetables, snacks, frozen meat and all the ice blocks together, they will all end up in a messy mess. Proper layering not only avoids such chaos but also extends the ice preservation time. Here, based on the personal (painful) experiences of our colleagues, we have summarized an almost universal method for layering your cooler content:
Bottom layer: Block ice + frozen goods
Start with block ice and frozen items (meats, fish, pre-made meals, which can also serve as ice) at the bottom. Block ice melts slowly, creating a solid cold base, while frozen goods keep the cooler’s core temperature low.
Middle layer: Drinks, dairy, and semi-perishables
Place drinks, milk, cheese, or items needing consistent (but not ultra-frozen) temps here. They stay cool from the cold below and are easy to grab without digging through frozen items.
Top layer: Delicate items
Put bread, eggs, or snacks on top. These don’t need extreme cold but are prone to crushing or warming if jostled.
Pro Tip: Fill gaps between layers with loose ice to ensure even cooling and reduce air pockets, which accelerate melting.

7. Use Cooler Accessories to Stay Organized
Small tools make coolers more functional—less digging means the lid stays closed longer, preserving ice.
- Dry rack basket: Keeps bread, pastries, or snacks off ice to avoid sogginess.
- Dividers: Separate drinks from food or raw meat from veggies for easy access.
- Cutting board divider: Doubles as a divider and a camp chopping surface.
- Tray inserts: Hold small items like condiments to prevent rolling.
- Ice pack holders: Keep ice packs in place for even cooling.
8. Reusable Ice Packs
It’s recommended to purchase some reusable ice packs. You can easily find them in your local supermarkets or stores. There are mainly two advantages: They have a fixed shape, which makes them easier to stack and organize; and even when they melt, they won’t turn into water and spread everywhere like regular ice.

9. Smart Habits for Packing (and Using)
It’s not just how you load the cooler—it’s how you handle it on the go. These habits lock in cold:
- Don’t immediately open the cooler every time you think of taking something: It’s better to accumulate a few items you want to take together and then take them all at once. This way, the repeated actions of opening and closing the lid can be condensed into just once.
- Organize by frequency of use: Put often-grabbed items (drinks, snacks) on top to avoid prolonged digging.
- Avoid overpacking or underpacking: Too much empty space lets warm air circulate; too stuffed blocks cold air flow. Aim for a tight fit with room for cold to move.

10. Bonus Hacks to Up Your Cooler Game
Stretch ice life even further with these simple tricks:
- Freeze water bottles: They act as ice packs and turn into drinking water once thawed.
- Add extra insulation: Wrap a towel, foam pad, or reflective cover around the cooler to block sun and outside heat.
- Keep it in the shade: Even top coolers struggle in direct sun. Stash it under a tree, in a tent, or under a blanket—less sun = less melt.
In one test, a reflective cover on a cooler during a 90°F beach day extended ice life by 6 hours compared to an uncovered cooler.
Final Thoughts: No “One-Size-Fits-All” Trick
Cooler packing depends on your trip: A weekend beach day needs different strategies than a week-long camping trip. Experiment with tricks (more ice packs vs. block ice) to find what works for you.
These tips apply to most coolers, regardless of brand or style. But coolers of high quality save you half of your effort. And with the right approach, you’ll keep food fresh, drinks icy, and trips stress-free—no matter where your adventures take you.
Wonder how coolers keep your items cold? Read our relevant post: How Does a Cooler Box / Ice Chest Work?