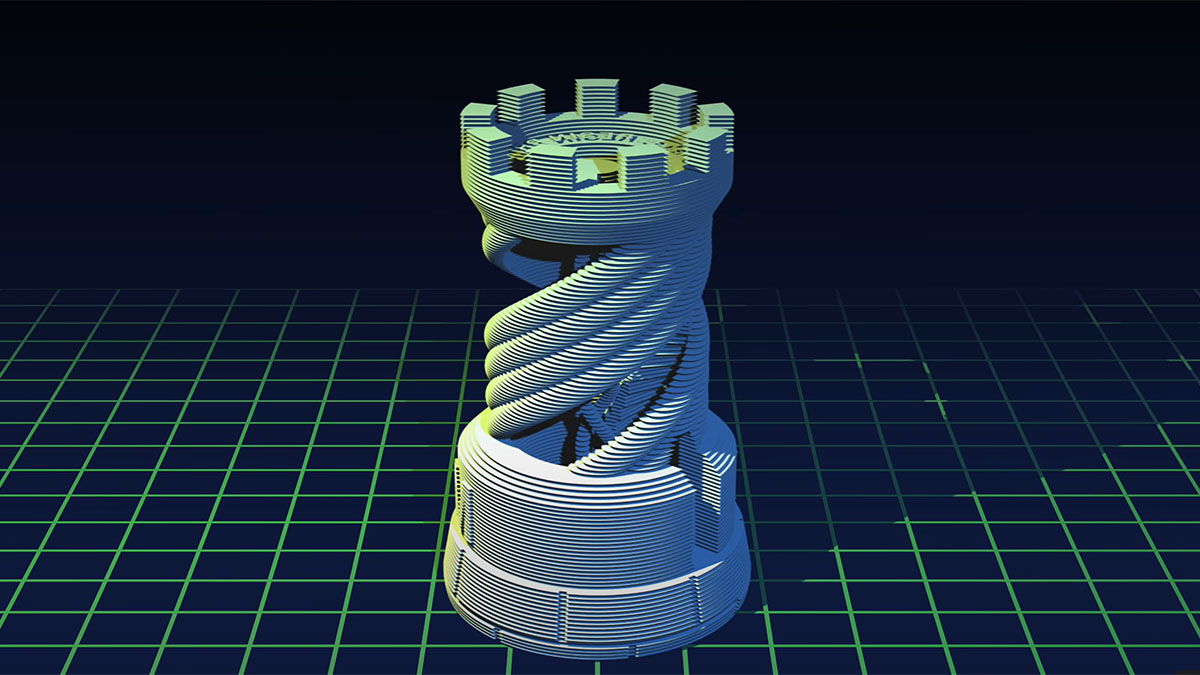
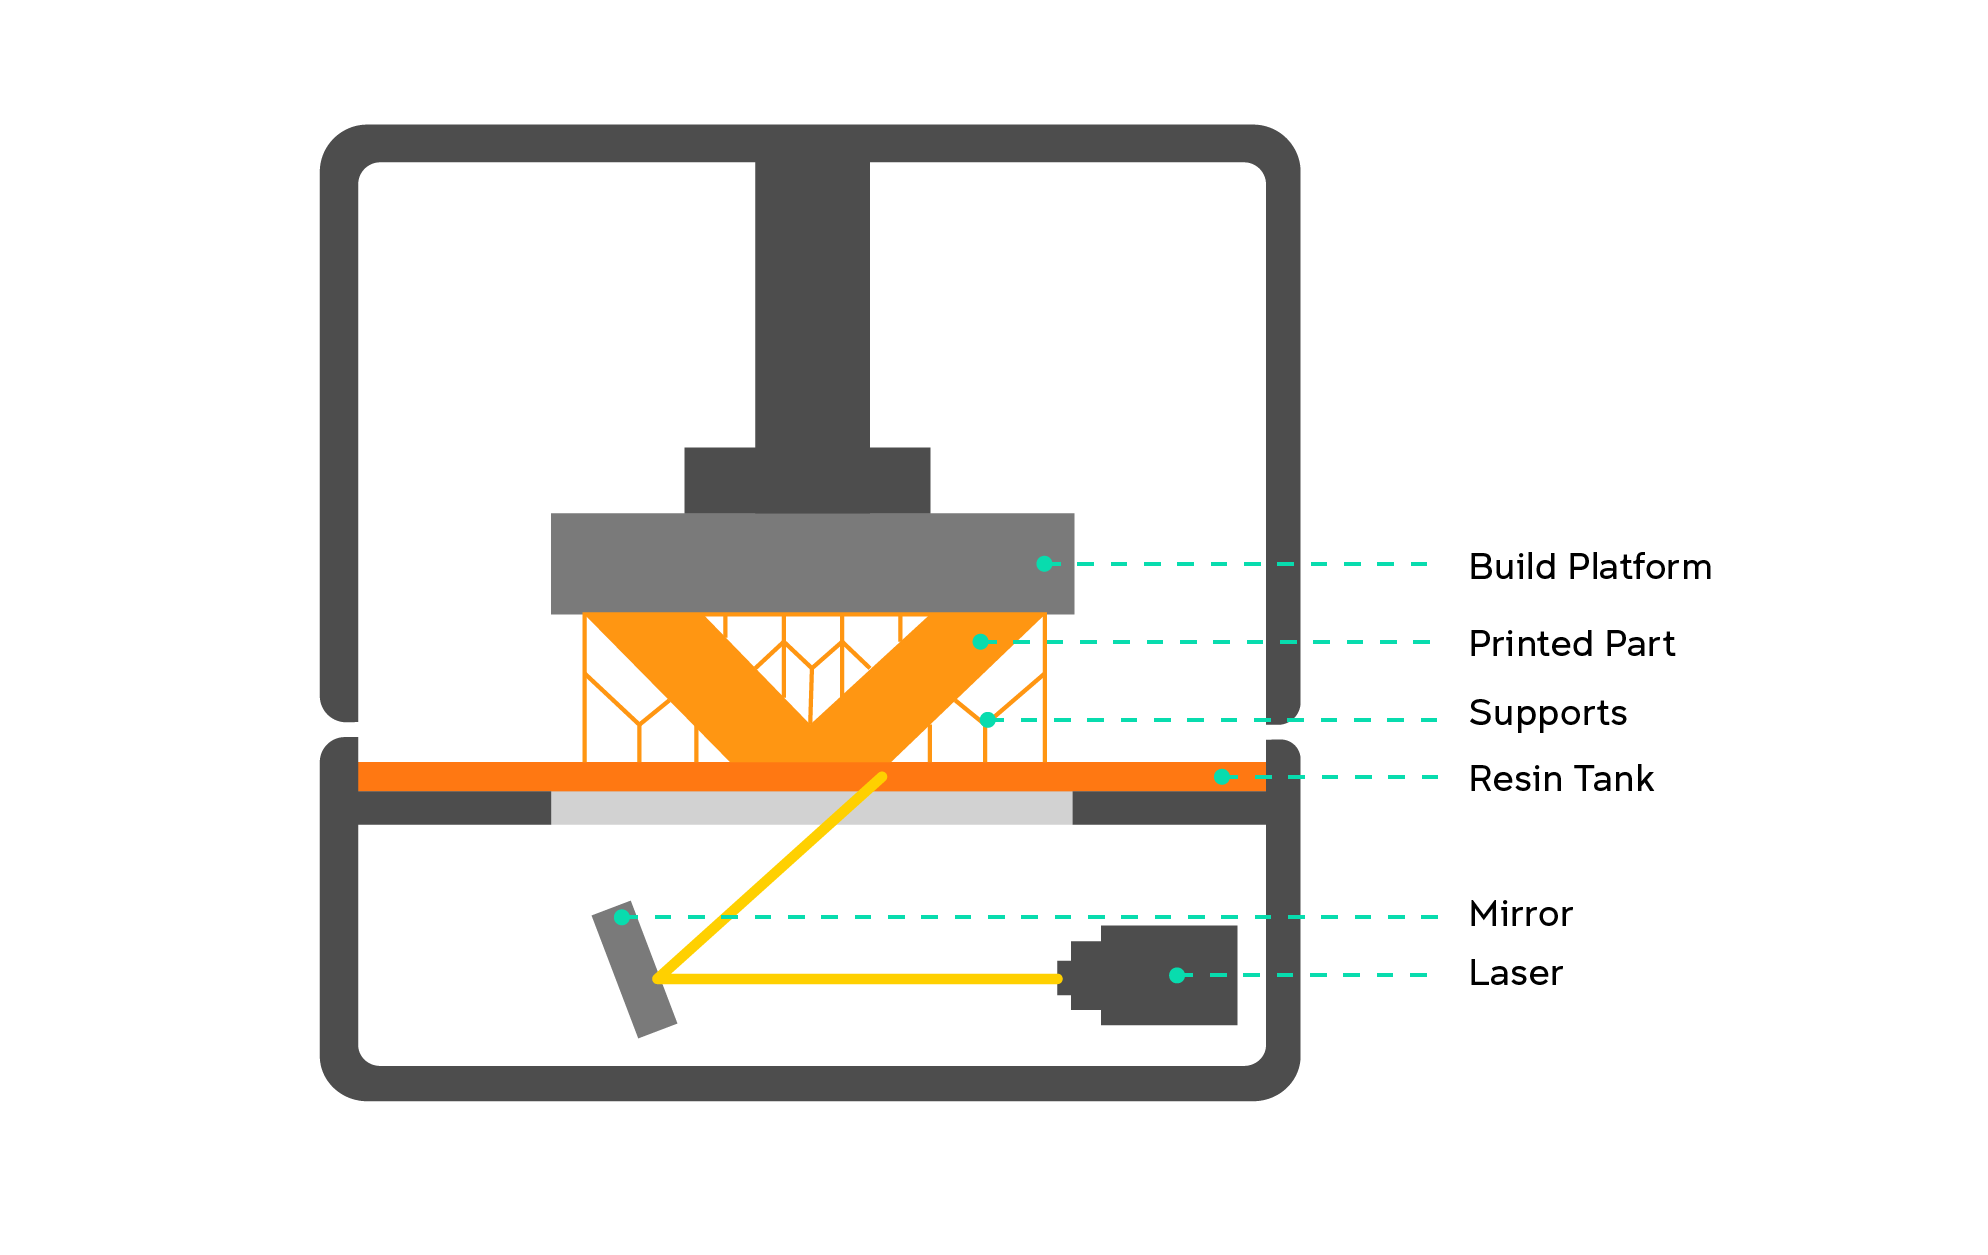
Stereolithography (SLA) is a precision 3D printing technique that utilizes a laser to solidify liquid photopolymer resin, building up a model layer by layer. One of the earliest 3D printing methods, SLA is renowned for producing intricate, high-resolution parts with smooth finishes. In this process, a resin tank holds the liquid material, while a laser beam traces the design of the part onto the surface of the resin, hardening it as it goes. Once a layer is completed, the platform lifts slightly, and the next layer is formed, bonding with the previous one. This cycle continues until the object is fully printed.
- Benefits of SLA over other 3D Printing Methods
- Key Factors in Designing for SLA Printing
- Supported and Unsupported Walls in SLA
- Dealing with Overhangs
- Designing Fine Details: Embossed and Engraved Features
- Creating Functional Holes in SLA Prints
- Optimizing Horizontal Bridges and Connectors
- Designing Slots, Pins, and Mating Parts
- Managing Print Resolution in SLA
- Hollowing and Cupping in SLA Parts
- Common SLA Materials and Their Applications
- Design Specifications in Summary
- Conclusion
Benefits of SLA over other 3D Printing Methods
- High Precision and Detail: SLA offers exceptional resolution, making it ideal for producing parts with fine details. The laser’s precision can create parts with features as small as 30 microns, allowing for intricate and detailed designs that other 3D printing methods, like FDM, cannot match.
- Smooth Surface Finish: SLA prints typically have a smooth surface finish that requires minimal post-processing. This is especially beneficial when designing parts that need to be visually appealing or have specific aesthetic requirements.
- Ability to Print Complex Geometries: Due to the layer-by-layer curing process, SLA can create complex geometries that would be difficult or impossible to achieve with traditional manufacturing methods. This allows for greater design freedom.
- Accuracy: SLA printing provides high dimensional accuracy, which is particularly important in industries like jewelry, dental, and aerospace, where precision is critical.
- Wide Range of Materials: SLA resins come in a variety of formulations, including standard, engineering, dental, and castable resins, offering versatility in terms of both material properties and applications.
SLA stands out in its ability to create small, intricate, and highly precise parts, making it a popular choice for industries that require fine details and high-quality finishes. Its ability to produce detailed parts with smooth finishes sets it apart from other 3D printing technologies, such as FDM, which typically leaves behind more visible layer lines.
Key Factors in Designing for SLA Printing
Designing for SLA printing requires careful attention to several factors to ensure successful outcomes. From part orientation to material selection, each element plays a critical role in achieving both functional and aesthetic goals. Here are some key considerations:
Importance of Orientation
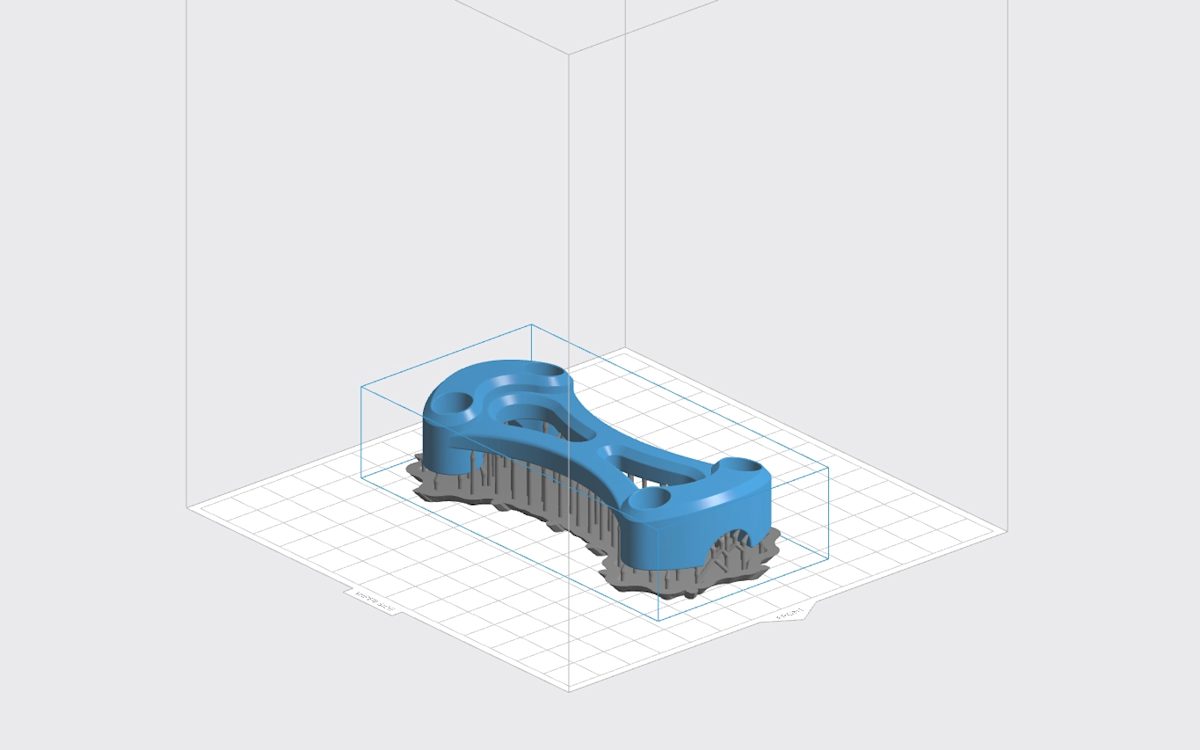
The model is oriented sub-optimally along the horizontal axis, resulting in a large cross-sectional area along the Z-axis. While this orientation reduces the need for supports, it significantly increases the risk of print failure. Print volume: 33.39 mL, Print time: 2 hours 27 minutes.
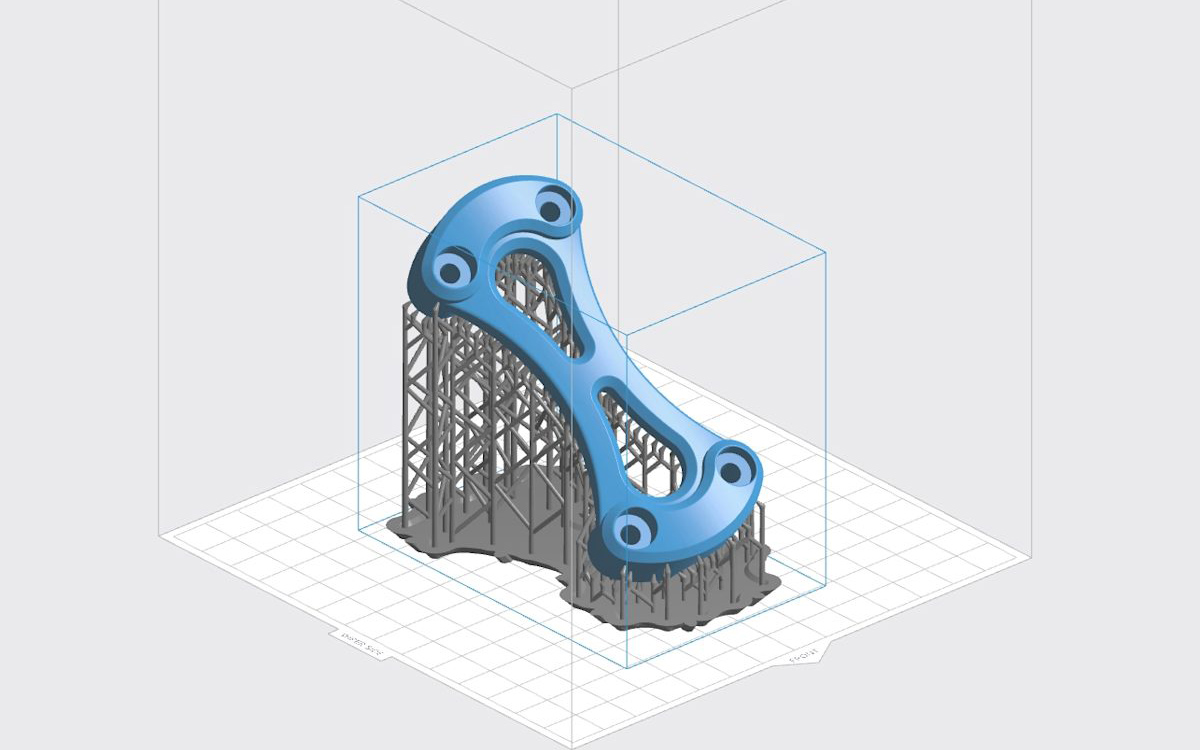
The model is re-oriented at an angle, minimizing the Z-axis cross-sectional area. While this requires a substantial increase in support, the trade-off is a significantly lower risk of print failure. Print volume: 36.95 mL, Print time: 4 hours 7 minutes.
The orientation of a part during the SLA printing process is crucial for optimizing print quality and minimizing potential issues. The most significant factor is the z-axis cross-sectional area, which determines how much force the resin will experience during the separation phase after each layer is cured. To reduce the chances of failure and warping, parts should be oriented in a way that minimizes the z-axis cross-sectional area.
- Optimal orientation: Typically, parts should be printed at an angle to reduce the cross-sectional area along the z-axis, which reduces the forces acting on the layer during the printing process.
- Impact of support structures: In some cases, optimizing orientation may require more support structures, but this is often a trade-off worth making to reduce the risk of print failure.
- Visual appearance: The orientation can also affect the final appearance of the print. For parts that require smooth surfaces, it’s best to orient the part so that the smooth surfaces face upwards, reducing the contact with support structures and resulting in a better finish.
Impact of Material Properties on Design
The material used in SLA printing can significantly impact the final design, as each resin type has different characteristics. Understanding these properties is essential for achieving the desired function and appearance of the printed part.
- Brittleness: Standard SLA resins tend to be brittle, which may limit their use in functional parts that will be subjected to mechanical stresses. Designs that require flexibility or high durability may require the use of engineering resins or flexible materials.
- Heat Resistance: Some SLA resins are better suited for high-temperature applications. When designing for SLA, it’s important to select a resin that can withstand the operating conditions of the part.
- Material-specific considerations: Each material has specific design requirements, such as wall thickness or detail resolution. For example, castable resins require fine detail for casting applications but have different shrinkage properties than standard resins. Designers should take these factors into account when designing parts to ensure they perform as expected.
By considering part orientation and material properties during the design phase, you can optimize your design for the SLA process, improving both print quality and part functionality. These factors work together to ensure that parts meet the desired criteria in terms of strength, surface finish, and overall performance.
Supported and Unsupported Walls in SLA
When designing parts for SLA printing, walls play an important role in the part’s structural integrity and printability. The distinction between supported and unsupported walls is crucial, as each requires different design considerations to ensure successful printing and minimize post-processing challenges.
Design Considerations for Supported Walls
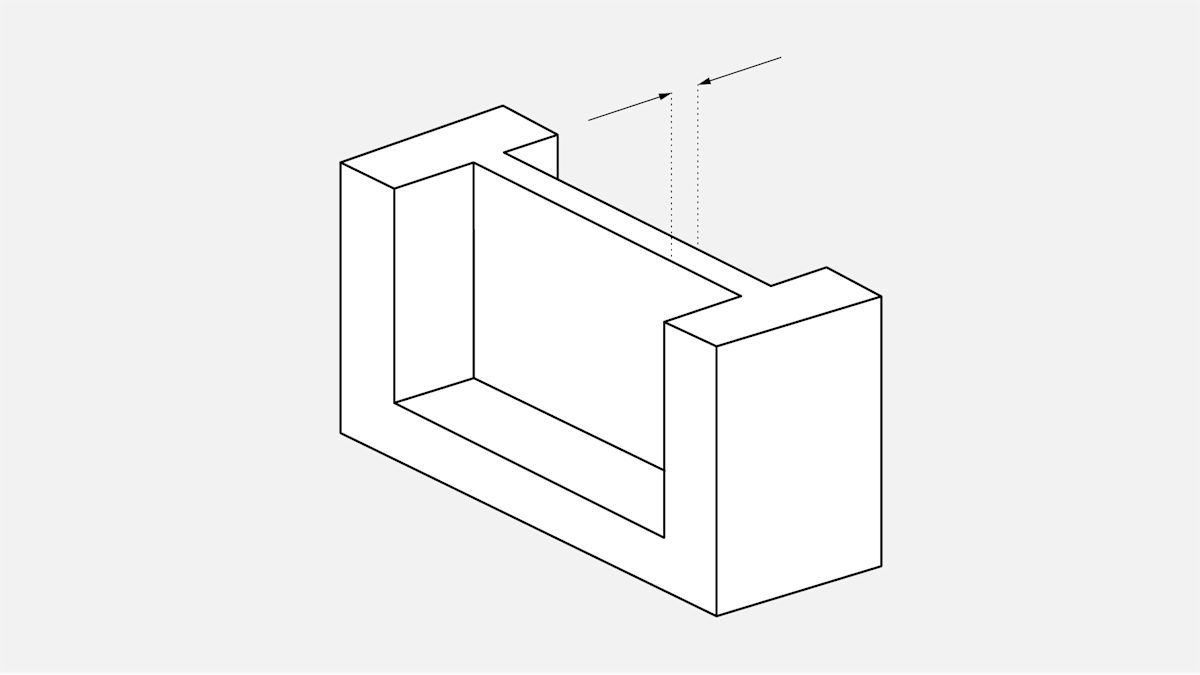
Supported walls are those that are connected to other structures on at least two sides, making them less prone to warping or detaching during the print process. These walls are usually more stable and easier to print. However, there are some key guidelines to follow for optimal results:
- Wall Thickness: Supported walls should be designed with a minimum thickness of 0.4mm. If the walls are too thin, they may warp or fail during printing. Too thick, and it could waste material and increase print time unnecessarily.
- Connection to Other Structures: Ensure that the supported walls are well connected to other parts of the model, helping to distribute the forces during the print process more evenly. This reduces the chances of layer detachment and increases the overall stability of the print.
- Avoid Thin and Tall Walls: While supported walls are less likely to fail, excessively tall or narrow supported walls may still encounter issues. Try to balance the proportions of the wall with the overall part design to avoid any structural weaknesses.
Guidelines for Unsupported Walls
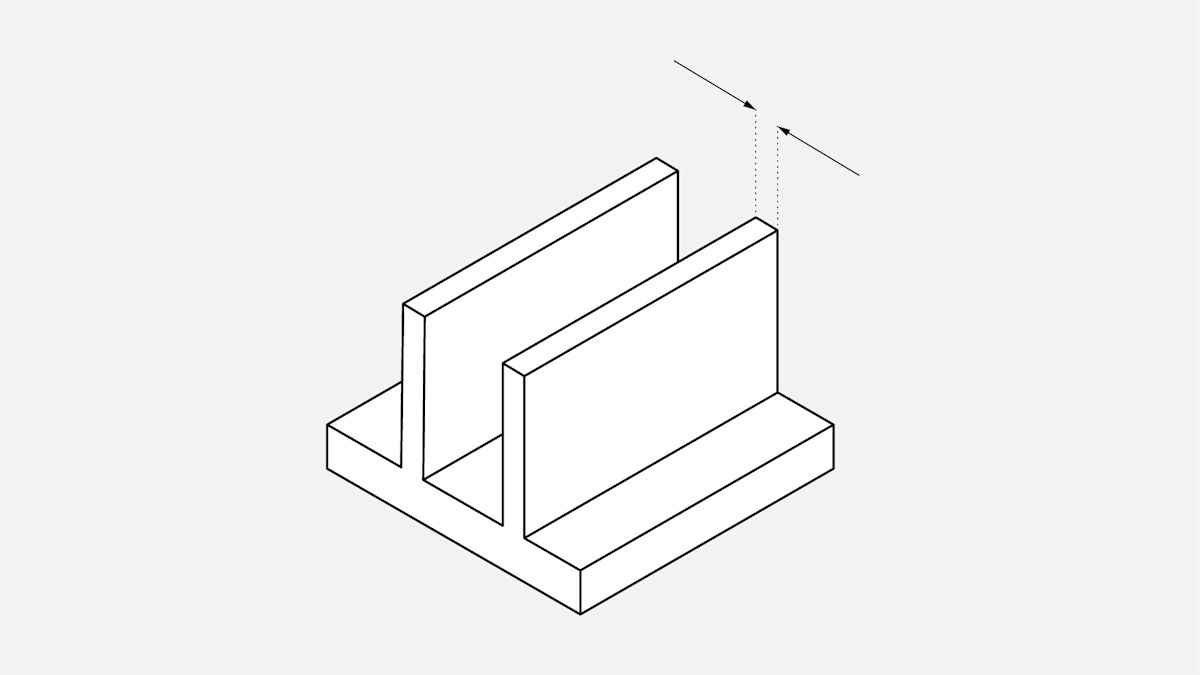
Unsupported walls, on the other hand, are connected to the rest of the print on fewer than two sides, making them more susceptible to detaching or warping during the print process. These walls are particularly challenging to print, and careful attention should be paid to their design to minimize print failure:
- Minimum Wall Thickness: Unsupported walls must be at least 0.6mm thick. Thinner walls are more likely to warp or detach from the part due to the forces acting during the separation of each printed layer.
- Filleted Bases: The base of unsupported walls should be designed with fillets (a rounded connection between the wall and the rest of the print). This helps to reduce stress concentrations at the joint, reducing the likelihood of failure at the point where the wall meets the rest of the part.
- Consider Adding Support Structures: For walls that are too large or unsupported, adding support structures can significantly improve the chances of successful printing. While these structures may require extra post-processing to remove, they can prevent warping or misalignment during printing.
Avoiding Overhangs: Unsupported walls often coincide with overhangs, which should be designed to be as short as possible to reduce the risk of failure. For example, unsupported overhangs should not exceed 1.0mm in length and should be at least 19° from level to avoid significant warping.
Dealing with Overhangs
Overhangs are a common challenge in 3D printing, including SLA, due to the nature of how layers are built upon each other. Overhangs occur when a part extends outward without sufficient support beneath it, causing issues such as sagging, warping, or detachment from the print bed. Understanding how to manage overhangs during the SLA process is key to ensuring successful prints.
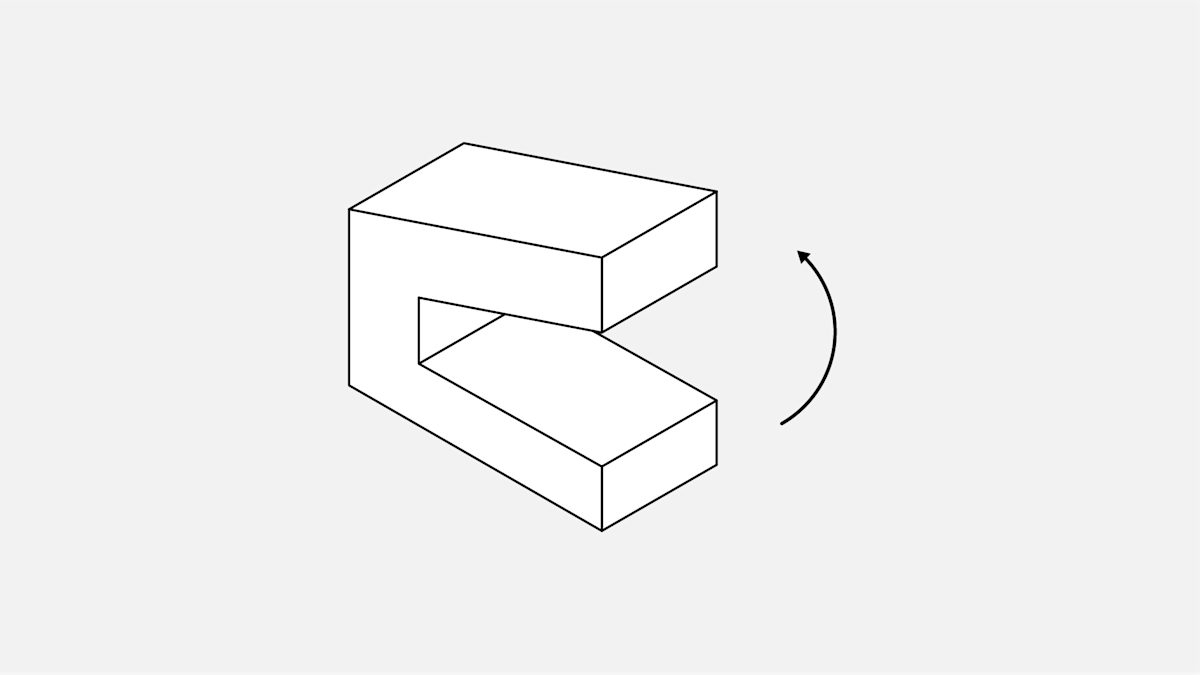
How to Manage Overhangs During the SLA Process
In SLA printing, overhangs are less of a concern compared to some other printing methods, such as FDM, because the liquid resin is cured layer by layer in a very controlled manner by the laser. However, overhangs still need to be carefully managed to ensure quality prints and to avoid failures.
- Optimal Angle for Overhangs: To reduce the risk of overhangs causing issues, it’s essential to keep overhangs at a less than 1.0mm in length and with an angle at least 19° from level. Overhangs with steeper angles are more likely to sag or deform during the printing process. For better results, orient overhangs to minimize steep angles.
- Orientation Matters: The orientation of the model on the print bed plays a major role in managing overhangs. If possible, orient the part so that the overhanging sections face upward. This minimizes the need for support structures and ensures the overhangs are printed without warping.
Segmenting the Model: If an overhang is too large or cannot be easily supported, consider splitting the part into smaller sections. These sections can then be printed separately and later assembled. This can prevent issues associated with large unsupported overhangs while maintaining the overall part design.
Importance of Supports for Overhangs
Supports are a crucial element in ensuring successful SLA prints, especially when dealing with overhangs. Supports help prevent the material from sagging, warping, or detaching during the printing process by providing a stable foundation for overhanging features.
- Support Structures: For large or intricate overhangs, support structures can be added to ensure that the print remains stable throughout the SLA process. These supports connect the overhangs to the rest of the part or the print bed, preventing the overhanging part from dropping or deforming under its own weight. These supports are usually removed after printing, but they are essential for a successful print.
- Support Material: While SLA supports are typically designed to be easily removed, they still require careful consideration during the design phase. The positioning and density of support structures should be optimized to minimize the amount of post-processing required to remove them. Adding too many or too few supports can lead to issues such as surface blemishes or inadequate support for the overhang.
- Avoiding Excessive Supports: While supports are important for ensuring print stability, they can add to the post-processing workload. The goal is to add the minimum amount of support necessary to maintain overhang integrity while minimizing the amount of surface area in contact with the support material. Proper design orientation and support settings can significantly reduce the need for excessive supports.
Designing Fine Details: Embossed and Engraved Features
One of the standout advantages of SLA printing is its ability to produce fine details with high precision. Whether you are adding embossed or engraved features to a model, it’s essential to follow specific design guidelines to ensure these details are captured accurately and clearly during the SLA process.
Guidelines for Embossed Details
Embossed details are raised features on the surface of a model, often used for adding text, logos, or other design elements. When designing embossed features, it’s crucial to ensure they are adequately defined to achieve a sharp, clean finish.
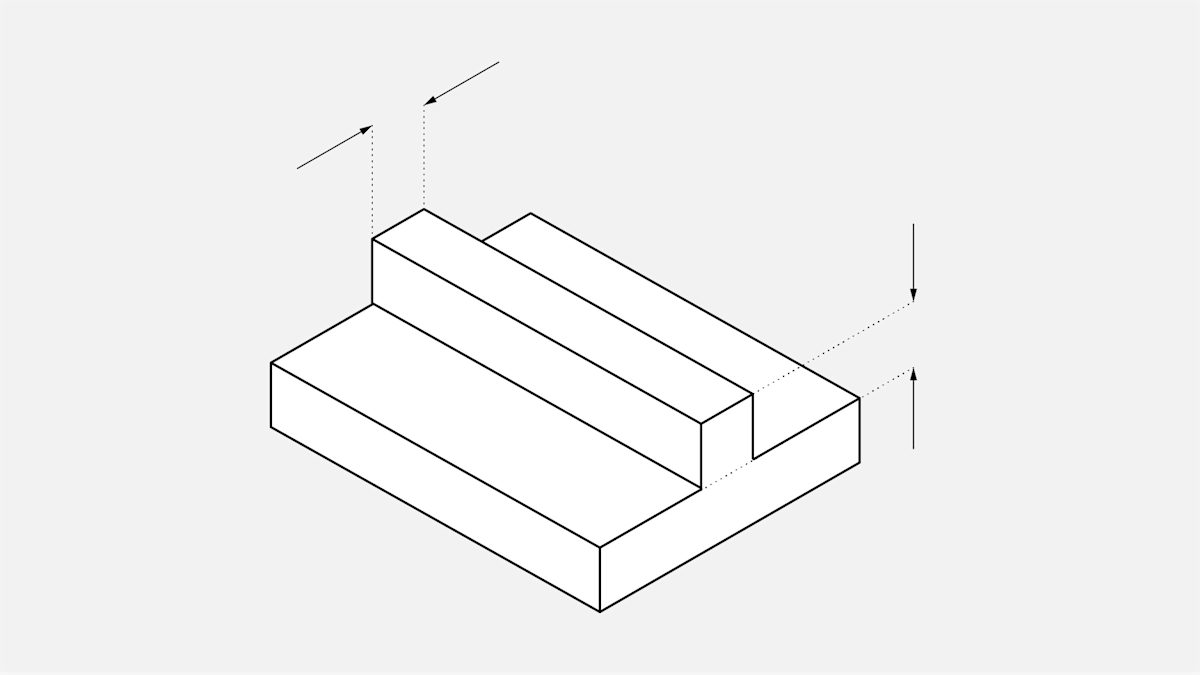
- Minimum Height: For embossed features to be visible and well-defined, they should be raised at least 0.1mm above the surface of the print. Any detail lower than this may be too subtle to be effectively captured, resulting in a lack of clarity.
- Feature Size: The size of the embossed detail should be proportionate to the model. If the feature is too small relative to the model, it may become indistinct or fail to print correctly. Ensure there is enough space around each embossed feature to allow for its clear display.
- Design Consistency: Consistency in the height and shape of the embossed features is essential for a professional look. Irregularities or inconsistencies in the detail height may lead to distorted prints.
Tips for Engraved Details
Engraved features are recessed or indented into the surface of the model and often serve as text, patterns, or intricate designs. These features require particular attention during the design phase to avoid printing issues such as fusion with the surrounding material.
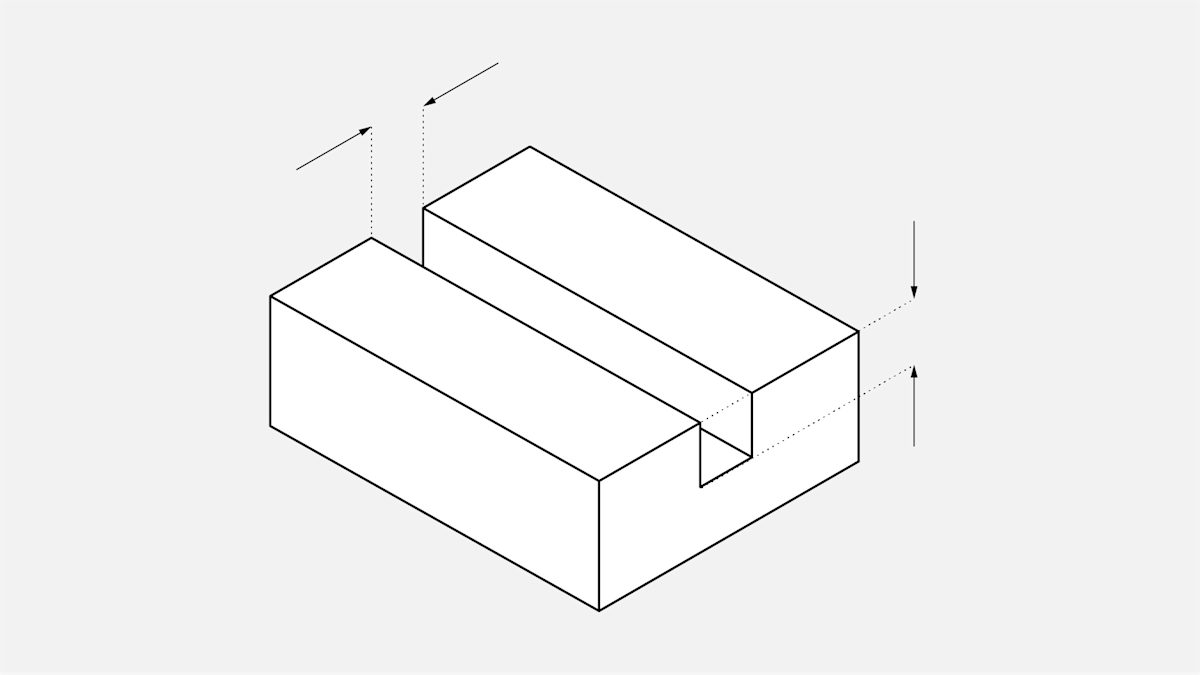
- Minimum Width and Thickness: Engraved details should have a minimum width of 0.4mm and thickness of 0.4mm. Features smaller than this risk fusing with the surrounding material or failing to print altogether due to the laser’s inability to accurately etch such fine details.
- Clear Depth: The depth of the engraving is just as critical as the width. Too shallow an engraving may make the detail indistinguishable, while too deep of an engraving could compromise the model’s integrity. It’s important to find a balance that allows the detail to be clearly visible without affecting the overall structure.
- Avoiding Thin Lines: While engraved features can be quite intricate, it’s important to avoid lines that are too thin or overly delicate. They may not properly fuse with the surrounding material and may result in broken or incomplete details after printing.
- Spacing: Proper spacing between engraved features is key to ensuring they remain distinct and clear. Features that are too close together may merge, leading to unclear or unreadable details.
By following these guidelines for embossed and engraved features, designers can maximize the precision and clarity of fine details in SLA prints. Whether adding logos, text, or decorative elements, proper design will ensure that the final print captures the intended detail and achieves a polished, professional look.
Creating Functional Holes in SLA Prints
When designing parts for SLA printing, creating functional holes can be a bit more challenging than with other 3D printing methods. SLA prints are highly detailed, but the process requires careful consideration to ensure that holes are effectively printed and functional for their intended purpose.

Minimum Hole Size for Effective Printing
SLA printing requires a minimum hole size to ensure that the laser can properly solidify the resin without causing issues like clogging or closing off the hole during the printing process.
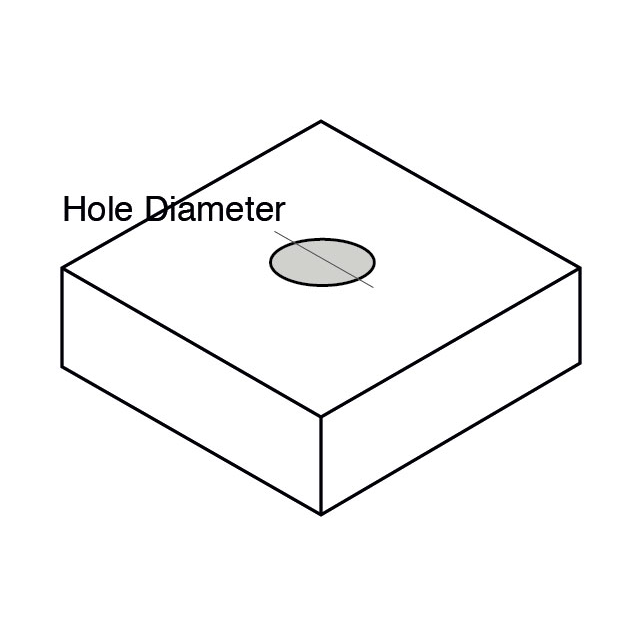
- Minimum Diameter: The minimum hole diameter for SLA printing is typically 0.8mm in the x, y, and z-axes. Holes smaller than this risk closing off during printing, leading to blocked passages or internal cavities.
- Tolerance: While SLA is highly accurate, it’s still important to consider slight variations in the final print. Holes smaller than the recommended size might also result in an imprecise or uneven finish.
Considerations for Hole Placement
Hole placement is a crucial element in SLA design, as poorly positioned holes can impact the structural integrity of the part or affect the accuracy of the printed features.
- Orientation and Supports: The orientation of the part during printing can greatly affect how holes are printed. Holes that are not oriented properly may result in poor resolution or over-exposure of the resin. Ensuring that holes are positioned so that the laser has a clear path can help prevent inaccuracies. Use appropriate supports to prevent deformations during printing.
- Drainage and Ventilation: If you’re designing hollow or complex parts with holes, it’s important to consider the need for drainage holes. These ensure that uncured resin does not get trapped inside and cause pressure imbalances, which can lead to part failure. For hollow prints, make sure that at least one hole is added per section, typically with a diameter of at least 3.5mm.
- Clearance and Fit: Functional holes, such as those intended for screws, pins, or other components, need sufficient clearance to allow for smooth fitting. Design with 0.5mm clearance for moving parts and 0.2mm for assembly connections. For snug fits, 0.1mm clearance is usually sufficient.
Structural Integrity: Consider the impact of hole placement on the overall structural integrity of the model. Holes placed too close to the edges or corners of a part may weaken the structure, leading to potential breakage during use or post-processing.
Optimizing Horizontal Bridges and Connectors
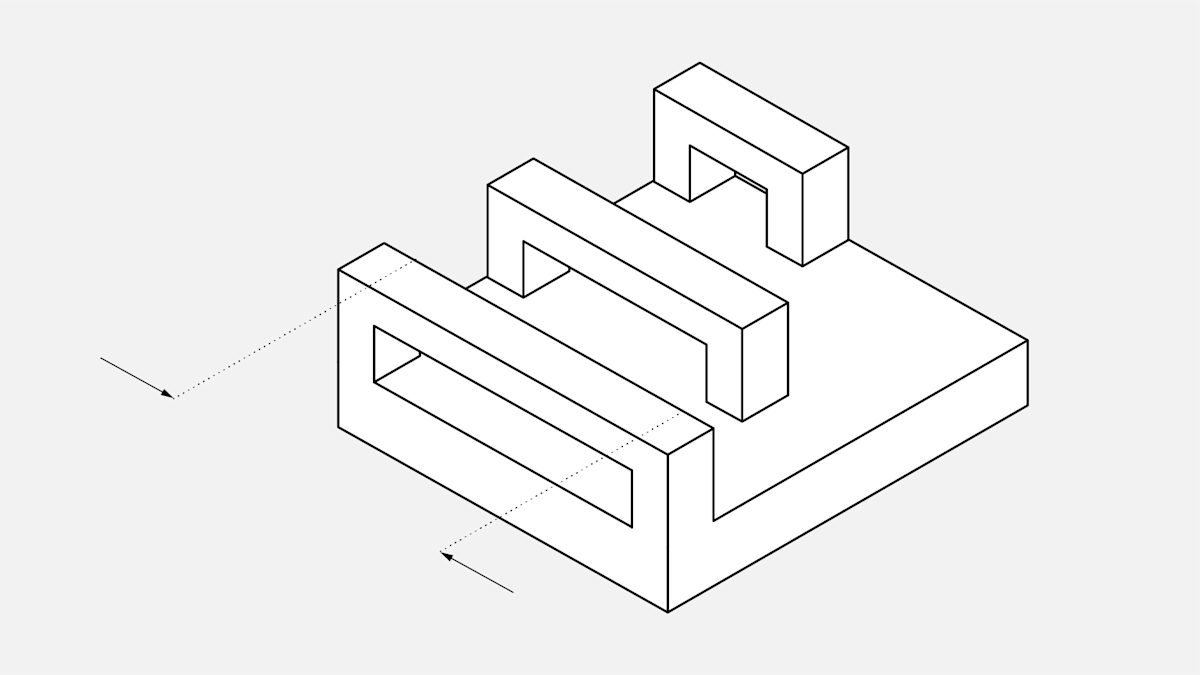
In SLA printing, horizontal bridges and connectors have a potential for warping or failure during the print process, therefore proper design considerations are essential to ensure these features are successfully printed while minimizing the risk of defects.
Design Recommendations for Bridges and Connectors
- Bridge Length and Thickness: Bridges are horizontal spans between two points of the model. To ensure a stable print, it is important to keep bridge lengths manageable. For wider horizontal bridges, the length should be kept to less than 21mm. Wider bridges tend to have a larger contact area with the build platform, which increases the risk of peeling or warping. On the other hand, thinner bridges can be longer, but the design should avoid overextending their length.
- Shape and Support: Consider designing bridges with slight arcs or support structures to reduce stress and prevent sagging. In cases where bridges span large distances, temporary supports may be necessary to prevent issues during the print. Bridges should also be designed with consideration for how the material will cure under UV light.
- Connector Placement: For connectors that serve as links between different parts of the model, ensure that they are placed at strategic points where the load distribution is balanced. The connector’s design should allow for easy fitting during post-processing without creating excess stress concentrations.
How to Minimize Print Failure Risks
- Use of Supports: While bridges may print successfully without support structures, it’s important to use support where necessary. Supports help prevent sagging, especially on longer bridges or more intricate connectors. If printing without support, ensure that the bridge length is kept short and the angle is optimized to minimize sag.
- Orientation: The orientation of the model during printing can significantly impact the quality of bridges and connectors. Ideally, place bridges so they have the least amount of exposure to the gravitational forces during the print. This minimizes the potential for sagging or deforming.
- Material Selection: Some resins are more prone to sagging than others, so it’s crucial to choose a resin with the appropriate balance of flexibility and hardness. Engineering resins, such as those designed for durability, can help minimize the risk of distortion in bridges and connectors.
- Layer Height Adjustments: Fine-tuning the layer height can also help improve the success rate of bridges and connectors. Higher resolution (lower micron) settings can help achieve better detail, but printing at a higher layer height may reduce the chance of warping by making the structure more robust as it builds.
Designing Slots, Pins, and Mating Parts
1. Slots
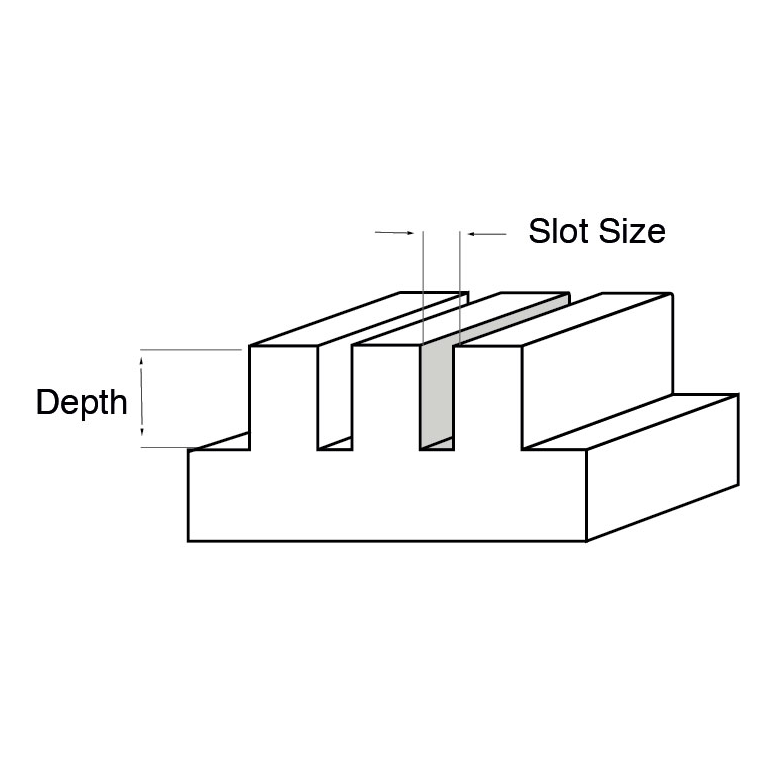
- Slot Size: The size of the slot is determined by the wall thickness or depth. A minimum slot size of 0.5mm is recommended, but larger slots are preferred, especially for thicker walls.
- Design Considerations: Ensure that slot depth increases proportionally with wall thickness to maintain part strength and improve printability.
2. Pins

- Pin Diameter: Pins, which are tall and thin with a circular cross-section, should have a minimum reliable diameter of 1mm. Diameters of 0.8mm are possible but increase the risk of breakage.
- Pin Height: Avoid excessive pin height, as it can lead to instability during the printing process and may cause breakage or warping during post-processing.
3. Mating Parts
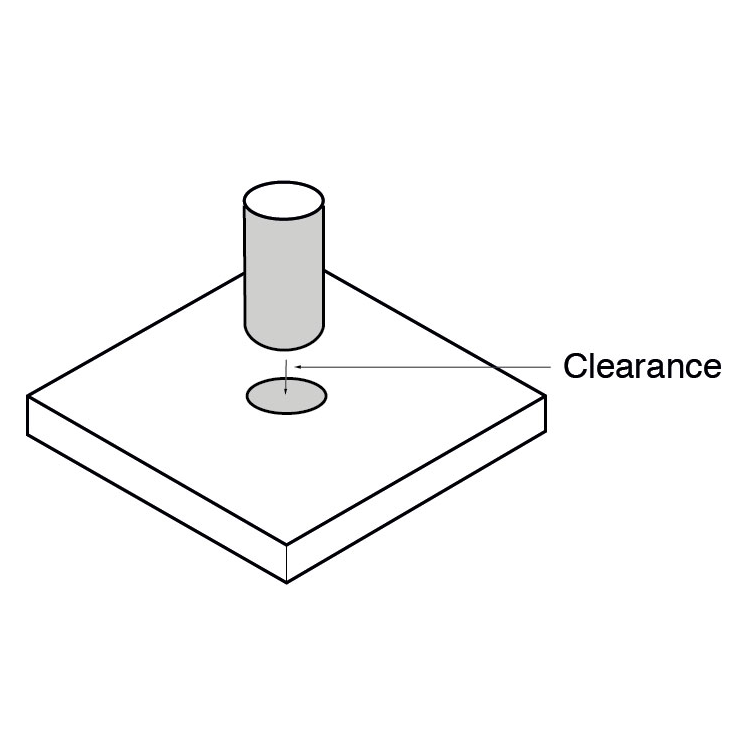
- Clearance: A minimum clearance of 0.5mm between mating parts is essential to prevent them from fusing together during printing.
- Functionality Considerations: Adequate clearance ensures that parts can move and function as intended, maintaining proper assembly and preventing the parts from becoming a solid unit.
Managing Print Resolution in SLA
SLA printing offers impressive resolution capabilities, but the decision to optimize speed versus quality involves balancing several factors. Understanding how to manage resolution can help you achieve the desired outcome for your project while staying within time and budget constraints.
Trade-offs Between Speed and Quality
- Finer Detail vs. Faster Printing: SLA printers are capable of achieving extremely fine details, especially in the z-direction (vertical resolution), where layer heights can be as fine as 25 microns. However, printing at this level of precision takes more time. If you are working on a model with fewer fine details or fewer curves, reducing the resolution can significantly speed up the printing process with little loss in visible quality.
- Speed Considerations: When speed is more important than ultimate resolution, opting for a slightly lower z-resolution (e.g., 100 microns) can reduce print time significantly without compromising the overall integrity of the part. This can be ideal for larger prints or prototypes where precise details are not as crucial.
- Quality Considerations: When precision and surface smoothness are essential, especially for intricate or highly detailed parts, it’s best to opt for the highest resolution settings. This ensures that small features are captured with sharpness and clarity, making SLA an excellent choice for parts requiring high-fidelity replication, such as dental models or fine jewelry.
Resolution Capabilities and Limitations
- XY Resolution: The horizontal resolution of SLA is determined by the size of the laser spot used in the printing process. Typically, the resolution in the xy-direction ranges from 30 to 140 microns. The finer the laser spot, the more detailed the printed surface can be. However, this also increases the print time as the printer needs more passes to complete the layer.
- Z Resolution: In terms of vertical resolution, SLA can achieve layer thicknesses from 25 microns to 200 microns, depending on the printer and resin type. While the minimum layer height can be as fine as 25 microns, printing at this resolution significantly increases the print time. If your design doesn’t require ultra-fine details, printing at a coarser resolution (e.g., 100 microns) may provide sufficient quality while reducing the overall printing time.
- Material Limitations: The properties of the resin also play a role in determining resolution. Some resins, especially standard resins, can capture fine details well but may not support high structural integrity. On the other hand, engineering resins may provide better mechanical properties but might not achieve the same level of fine detail as standard resins.
- Printer Limitations: The resolution achievable also depends on the specific SLA printer you’re using. Desktop SLA printers typically have limitations in both xy- and z-resolution, and the choice of printer should align with your project’s needs. Higher-end, industrial-grade SLA machines often offer much finer resolutions, but they come with higher costs.
Hollowing and Cupping in SLA Parts
Hollowing parts in SLA can significantly reduce material usage and print time, but it requires careful design to prevent issues like cupping. Understanding the proper techniques for hollowing and ensuring the structural integrity of your prints will result in more efficient production and higher-quality outcomes.
How to Hollow Parts for Cost and Material Savings
- Reducing Material Usage: Hollowing out your SLA parts is one of the most effective ways to lower material consumption and reduce print time. By removing internal mass, you decrease the amount of resin required, which can result in substantial cost savings, especially for larger parts.
- Wall Thickness Considerations: When hollowing a part, it is important to ensure the walls of the hollowed section are thick enough to maintain the strength and stability of the print. As a general rule, the walls of hollowed prints should be at least 2mm thick to avoid weak or fragile areas that could fail during printing or post-processing.
- Minimizing Internal Supports: Depending on the complexity of the part and the shape of the hollowed section, it may be necessary to add internal support structures. However, these supports should be minimized as much as possible to reduce material usage and post-processing time. Instead of adding extensive internal support, consider the geometry and orientation of the part to minimize the need for internal structures.
- Reducing Print Time: Hollowed parts print faster because they require less material and have fewer layers to complete. This can be especially useful in rapid prototyping and large-scale print runs, where time efficiency is a priority.
Preventing Cupping with Drainage Holes
- Understanding Cupping: Cupping occurs when uncured resin gets trapped inside a hollow part during the printing process. This can cause pressure imbalances, leading to deformation, cracks, or even explosions if not addressed. To avoid cupping, it’s crucial to ensure that uncured resin can escape freely from inside the hollowed areas.
- Drainage Holes: Adding drainage holes is essential when designing hollowed SLA parts. These holes allow the uncured resin to flow out during the printing process and prevent pressure buildup. Drainage holes should be at least 3.5mm in diameter to ensure sufficient resin flow and prevent any blockage.
- Hole Placement: Drainage holes should be placed strategically at the lowest points of the hollowed section. This positioning ensures that the resin can flow out without creating any air pockets that might cause the print to fail. It’s also important to add one hole per hollow section, especially for larger hollowed areas that might have multiple internal chambers.
- Post-Processing Considerations: After printing, ensure that the drainage holes are properly cleaned to remove any residual resin. Failure to do so could lead to issues with the cured part’s surface finish or its structural integrity. Post-curing the part in a UV chamber is also necessary to ensure that the resin solidifies fully and reaches its maximum strength.
Common SLA Materials and Their Applications
Among all 3D printing materials, many types of which are availble in Stereolithography (SLA) printing , each tailored to specific applications, from rapid prototyping to highly specialized industries like dental or jewelry. Choosing the right resin can greatly influence the quality, durability, and functionality of the final print. Below is an overview of the most common SLA materials and their recommended applications.
SLA Resins and Different Use Cases
| Use Case | Recommended Resin | Properties | Applications |
| Rapid Prototyping and Concept Models | Standard Resins | High-detail prints with smooth finishes, resolution smaller than 25 microns, easy to print with. | Ideal for high-detail prototypes and visual models, but not for load-bearing parts. |
| Functional Prototypes and End-Use Parts | Engineering Resins High-Temperature Resins |
Mimic engineering plastics (e.g., ABS, polypropylene), more durable and flexible, withstand higher temperatures. | Mechanical prototypes, automotive components, industrial parts requiring flexibility, toughness, or heat resistance. |
| Dental and Medical Applications | Dental Resins | Biocompatible, sterilizable, precise, meets medical and dental requirements. | Crowns, bridges, orthodontic models, surgical guides. |
| Jewelry and Fine Detail Models | Castable Resins | Burns cleanly with minimal ash, suitable for fine details (as small as 0.2mm), ideal for investment casting. | Jewelry, fine detail models, and investment casting applications. |
| Soft Touch and Wearable Products | Flexible Resins | Elastic, bends, stretches, compresses, mimics rubber-like properties. | Gaskets, seals, soft-touch parts, wearable products, and flexible prototypes. |
| Heat-Resistant Parts | High-Temperature Resins | Withstands temperatures up to 200°C or higher, maintains shape and integrity in high-heat environments. | Automotive components, heat-resistant enclosures, aerospace applications. |
In conclusion, selecting the right SLA resin depends largely on the intended use of the part. Whether you’re prototyping, manufacturing functional components, or creating intricate designs, understanding the properties of different resins will help ensure that your prints meet the desired specifications for quality, performance, and cost.
Design Specifications in Summary
| Feature | Specifications |
| Supported walls thickness | ≥0.4mm |
| Unsupported walls thickness | ≥0.6mm |
| Overhangs | ≤ 1.0mm in length
≥ 19° from level |
| Embossed details | ≥0.1mm in height |
| Engraved details | ≥0.4mm in width
≥0.4mm in thickness |
| Functional holes | ≥ 0.5mm, but typically = 0.8mm |
| Slots | ≥ 0.5mm (depends on wall thickness and depth) |
| Pins | ≥ 1mm (depends on pin height) |
| Mating parts | ≥ 0.5mm apart |
Conclusion
When it comes to achieving high-precision, intricate designs, SLA printing offers unrivaled capabilities. Its ability to produce small, finely detailed parts with exceptional surface finishes makes it an ideal choice for industries that demand perfection. From rapid prototyping to low-volume production, SLA delivers superior results for those seeking to bring their most complex designs to life.
For manufacturers, designers, and engineers, embracing SLA printing can elevate your product development process. With careful design considerations, you can unlock a new level of precision, reliability, and efficiency—whether you’re working on medical devices, consumer products, or cutting-edge automotive components.
The key lies in understanding the unique advantages of SLA printing: its ability to create high-resolution, geometrically complex models with smooth finishes that would be difficult or impossible to achieve with traditional manufacturing methods. By optimizing for factors like wall thickness, overhangs, and resolution, you can avoid costly errors and make sure your prints meet the highest standards.
Moreover, the choice of materials is critical. With the wide range of resins available—each offering distinct mechanical and aesthetic properties—SLA is more versatile than ever. Whether you need a flexible prototype, durable dental device, or a castable resin for intricate jewelry, SLA’s material options ensure that your designs not only look great but perform well in real-world applications.
As a leading on-demand manufacturer, KingStar understand the challenges of design for SLA and offer expert guidance and advanced printing capabilities to help bring your ideas to life. Our commitment to quality, precision, and customer satisfaction means that we are always here to support you through every stage of your project—whether you’re just starting out or are already familiar with 3D printing. Let us help you turn your concepts into reality with the power of SLA printing.
Ready to take your designs to the next level? Reach out to us today and discover how SLA printing can transform your product development journey.
